Raspberry Pi first setup
Raspberry Pi first setup starts by preparing the required hardware, writing the operating system to the boot media, and connecting power only after the setup is ready. A safe first boot relies on the correct parts, a prepared microSD card, and a suitable power supply.
A safe first boot relies on the correct parts, a prepared microSD card, and a suitable power supply.
A desktop setup uses a monitor, keyboard, and mouse so you can complete the initial startup directly on the Raspberry Pi. A headless setup uses Wi-Fi or another supported network connection for remote access, so the required network credentials should be prepared before startup. For broader model, buying, and use information beyond this first setup process, visit the Raspberry Pi hub. After choosing the setup path, confirm that the required hardware and access method match your Raspberry Pi model.
For broader model, buying, and use information beyond this first setup process, visit the Raspberry Pi hub .
Most first setup problems result from an incorrectly prepared microSD card, an unsuitable power supply, an incorrect display connection, or missing network details for headless setup. Use Raspberry Pi Imager to write the operating system image to the microSD card, then verify the storage, display or network path, and power connections before applying power. If your Raspberry Pi model uses different connectors or network options, confirm those requirements before the first boot.
This page is intended for beginners completing a Raspberry Pi first setup.
This page is intended for beginners completing a Raspberry Pi first setup. It focuses on the path to a successful first boot and first login rather than advanced operating system selection, long-term maintenance, or complete troubleshooting.
Table of Contents
Raspberry Pi setup requirements before first boot
Raspberry Pi setup requirements before first boot include a Raspberry Pi board, prepared boot storage, a suitable power supply, and either a local desktop setup or a remote access path. Confirm that every required part is ready before connecting power.
Confirm that every required part is ready before connecting power.
Missing cables, an unprepared microSD card, or an unsuitable power supply can delay startup before the operating system loads. Prepare the boot storage with a computer and card reader, then confirm that the display or network path matches the intended setup. For criteria on choosing the minimum required accessories, see Raspberry Pi setup parts. Use the checklist below to verify readiness.
The image labels the parts to verify before power is connected.
Raspberry Pi setup requirements before first boot are easier to check when the main components are visible together. The image labels the parts to verify before power is connected.
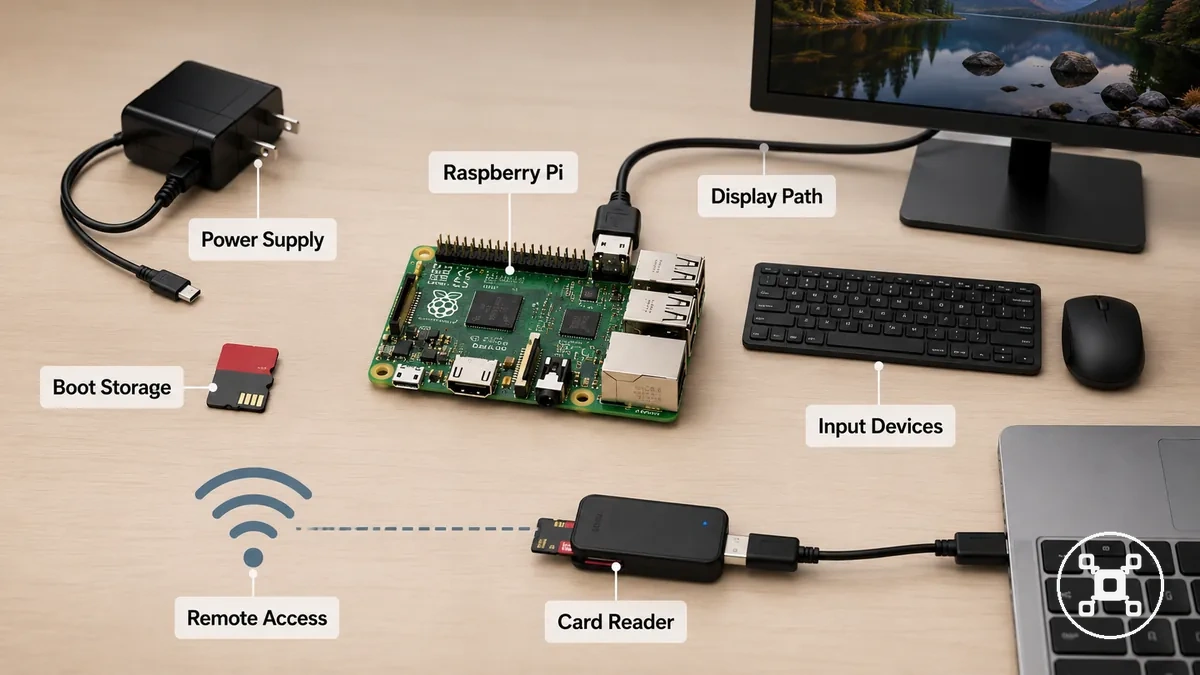
- Raspberry Pi board: Confirm that the board is the model you intend to use and that its power, display, and input ports match the selected setup parts; a mismatch prevents the required connections before first boot.
- Power supply: Use a supply and cable specified for the Raspberry Pi model; an unsuitable connection can cause unstable startup or prevent the board from booting.
- microSD card: Use a card containing a prepared operating system image; an empty or incorrectly prepared card does not provide usable boot storage.
- Card reader and computer: Use the card reader with a computer to prepare the microSD card before installation; without this preparation path, the operating system image cannot be written to the boot storage.
- Monitor and HDMI cable: For a desktop setup, use a monitor and an HDMI cable or display adapter that matches the board's display port; the correct display path provides local first-boot output.
- Keyboard and mouse: Connect both input devices for a local desktop setup; they provide direct control during initial configuration.
- Wi-Fi or Ethernet: For a headless setup, prepare one supported network path and the required credentials; remote access is available only when the network configuration and Raspberry Pi settings permit discovery and login.
- Final readiness check: Verify the boot storage, power supply, display or remote access path, and required input devices before applying power; the correct combination is determined by the Raspberry Pi model and chosen setup path.
Required parts for a desktop setup
A desktop setup needs visible display output and direct input before the first boot. Prepare the monitor, keyboard, mouse, boot storage, and Raspberry Pi board before connecting power. The parts below help confirm desktop setup readiness.
The parts below help confirm desktop setup readiness.
Connector mismatch is a common reason a display setup does not work as expected. Check that the HDMI cable or adapter matches the display connector used by your Raspberry Pi model before startup. After confirming the local parts, you can compare compatible options in Raspberry Pi setup parts.
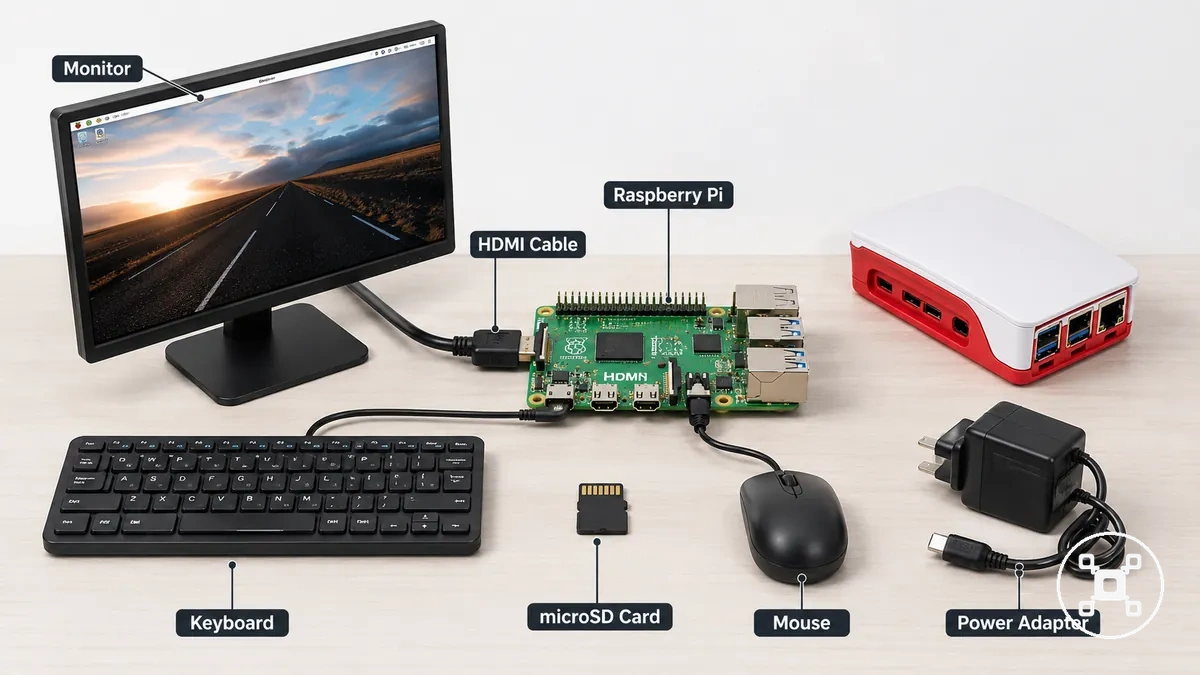
- Raspberry Pi board: Use the intended board with accessible display and USB ports so local peripherals can be connected for first boot.
- microSD card: Use a prepared microSD card as the boot storage so the Raspberry Pi has an operating system to start.
- Power adapter: Use a power adapter intended for the Raspberry Pi model to provide stable startup power.
- HDMI cable or adapter: Match the cable or adapter to the Raspberry Pi display connector and the monitor input to enable visible output.
- Monitor: Connect a monitor with a compatible input so startup messages and the desktop interface are visible.
- USB keyboard and mouse: Connect both input devices to available USB ports so local configuration and navigation are possible during first boot.
- Case: If a case is used, confirm it provides access to the required ports and allows the board to fit without blocking cable connections.
Computer and storage tools for preparing the OS
The Raspberry Pi needs prepared boot storage before it can start. Prepare the operating system image on a microSD card using a separate computer before inserting the card into the Raspberry Pi. Computer and storage tools for preparing the OS are used before the board is powered.
The Raspberry Pi needs prepared boot storage before it can start.
Computer and storage tools for preparing the OS include a computer, an SD card reader, Raspberry Pi Imager, a compatible operating system image, and a microSD card ready for boot storage. The image below shows the tools used before the Raspberry Pi is powered and leads into the preparation checklist.
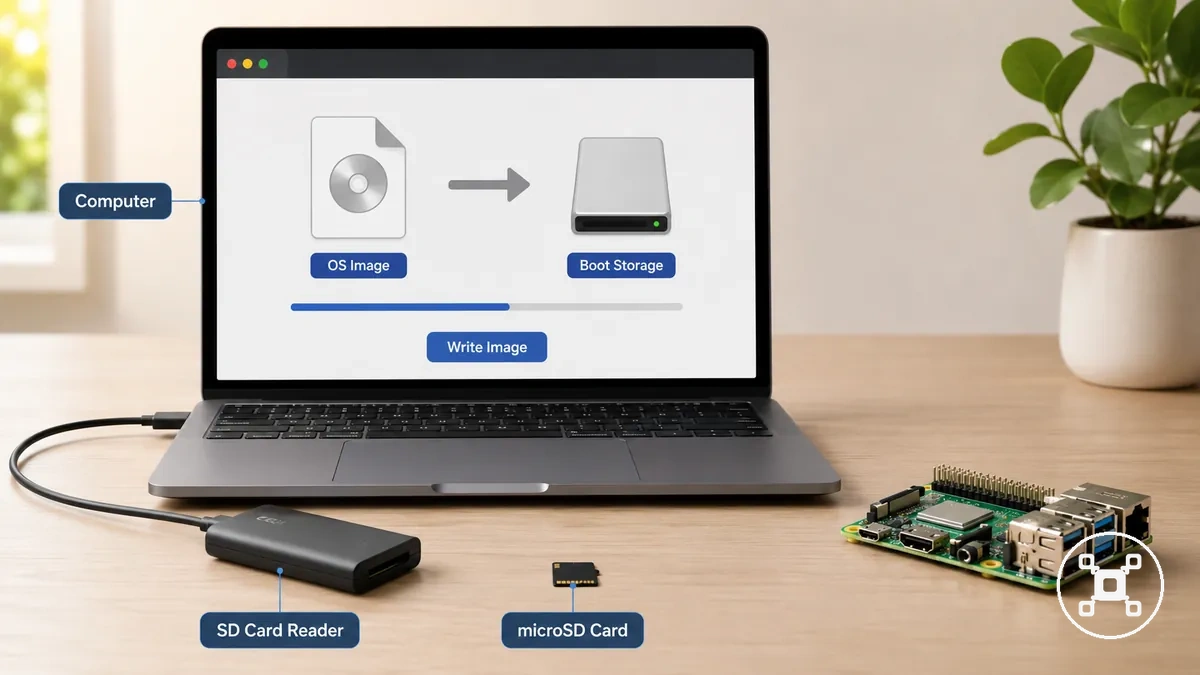
For broader decisions about storage devices rather than preparation tools, see Raspberry Pi storage options.
- Computer: Runs Raspberry Pi Imager to write the operating system image and is ready when the correct destination device is selected.
- microSD card: Stores the operating system image as boot storage and is ready after the write image process completes successfully.
- SD card reader: Connects the microSD card to the preparation computer and is ready when the card is detected correctly.
- Raspberry Pi Imager: Writes the operating system image to the boot storage and is ready when the write image process finishes.
- Operating system image: Provides the software needed for first boot and is ready after it has been written to the microSD card and safely removed.
Model-dependent cable and power checks
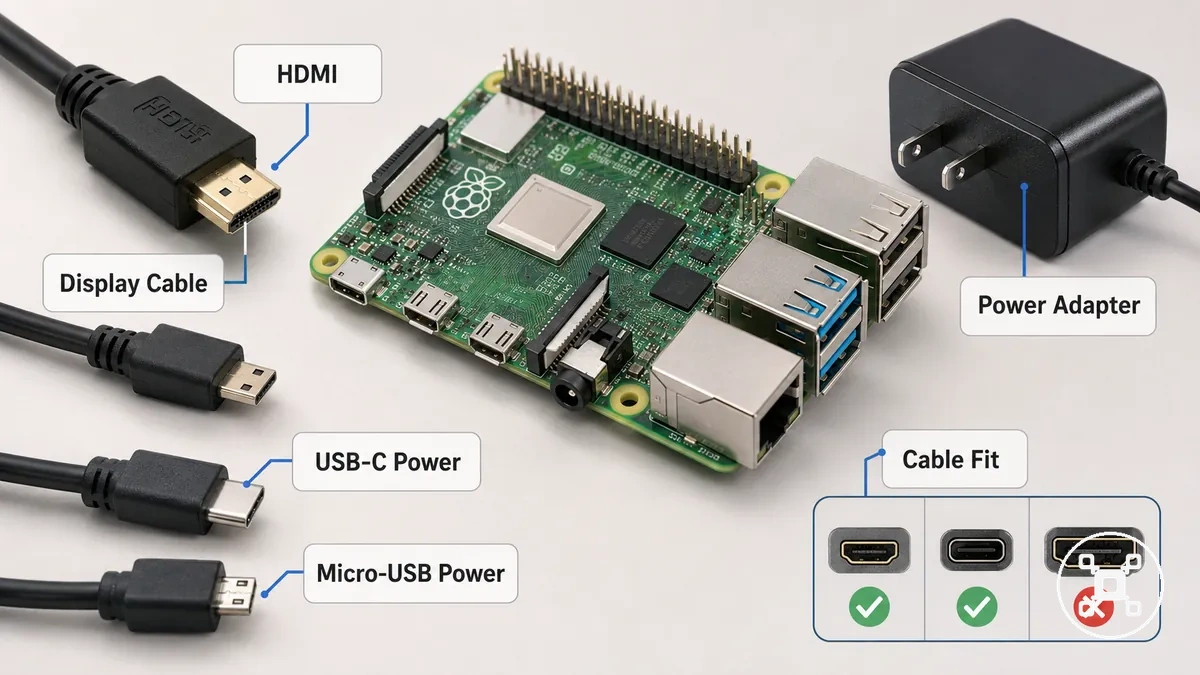
Cable and power requirements depend on the Raspberry Pi model because connector types and power inputs are not identical across every board. Check the Raspberry Pi model first so the HDMI connector, display cable, power supply, and adapter match the required connector type before setup.
The table below separates display checks from power checks.
Using the wrong HDMI connector or display cable can prevent monitor output, while a weak or incorrect power supply can cause restart warnings or unstable boot stability during first boot. Models that use USB-C power require a matching USB-C power connection, while models designed for micro-USB power require the corresponding connector. After confirming the correct power requirement, see Raspberry Pi power requirements for model-specific guidance. The table below separates display checks from power checks.
| Model-dependent item | What to check | Why it matters |
|---|---|---|
| HDMI/display connector | Match the HDMI connector or adapter to the Raspberry Pi model and the display cable connector. | Correct cable fit enables display output during startup. |
| Power connector | Confirm whether the Raspberry Pi model uses USB-C power or micro-USB power and connect a suitable power supply. | The correct power connection supports stable boot behavior, while weak or incorrect power can cause startup problems. |
| USB input availability | Verify that the available USB ports match the keyboard, mouse, or other required input devices. | Matching USB input availability allows local setup without connection issues. |
| Adapter quality | Use an adapter designed for the required connector type with a secure physical connection. | A suitable adapter helps reduce setup issues caused by poor connector fit. |
Choose the first setup path
The best first setup path depends on the display hardware you have, your confidence with remote access, and whether Wi-Fi credentials can be prepared before first boot. A desktop setup suits users with a monitor, keyboard, and mouse, while a headless setup is appropriate when remote access has been planned and the required network settings are ready. If you are unsure which path to choose, beginners should prefer the option with the fewest unknowns.
The comparison below highlights the key selection criteria.
For a beginner setup, a desktop setup provides immediate on-screen feedback, making startup messages and configuration easier to verify. In contrast, a headless setup removes the need for a monitor but requires network access before remote login is possible, typically through Ethernet or prepared Wi-Fi credentials together with SSH. If those requirements are not available before first boot, device discovery and troubleshooting become more difficult because setup feedback is not shown locally. The comparison below highlights the key selection criteria.
| Desktop setup | Headless setup |
|---|---|
| Requires a monitor, keyboard, and mouse for local setup. | Requires network access and remote access through SSH without using a monitor. |
| Network settings can be configured after local startup. | Wi-Fi credentials should be prepared before boot, or Ethernet should be available for the first connection. |
| Lower beginner difficulty because setup messages and errors are visible on screen. | Higher beginner difficulty because remote login and device discovery must succeed before configuration. |
| Best for first-time users who want direct visibility during setup. | Best when remote management is the goal and network requirements have already been prepared. |
Desktop setup with a monitor, keyboard, and mouse
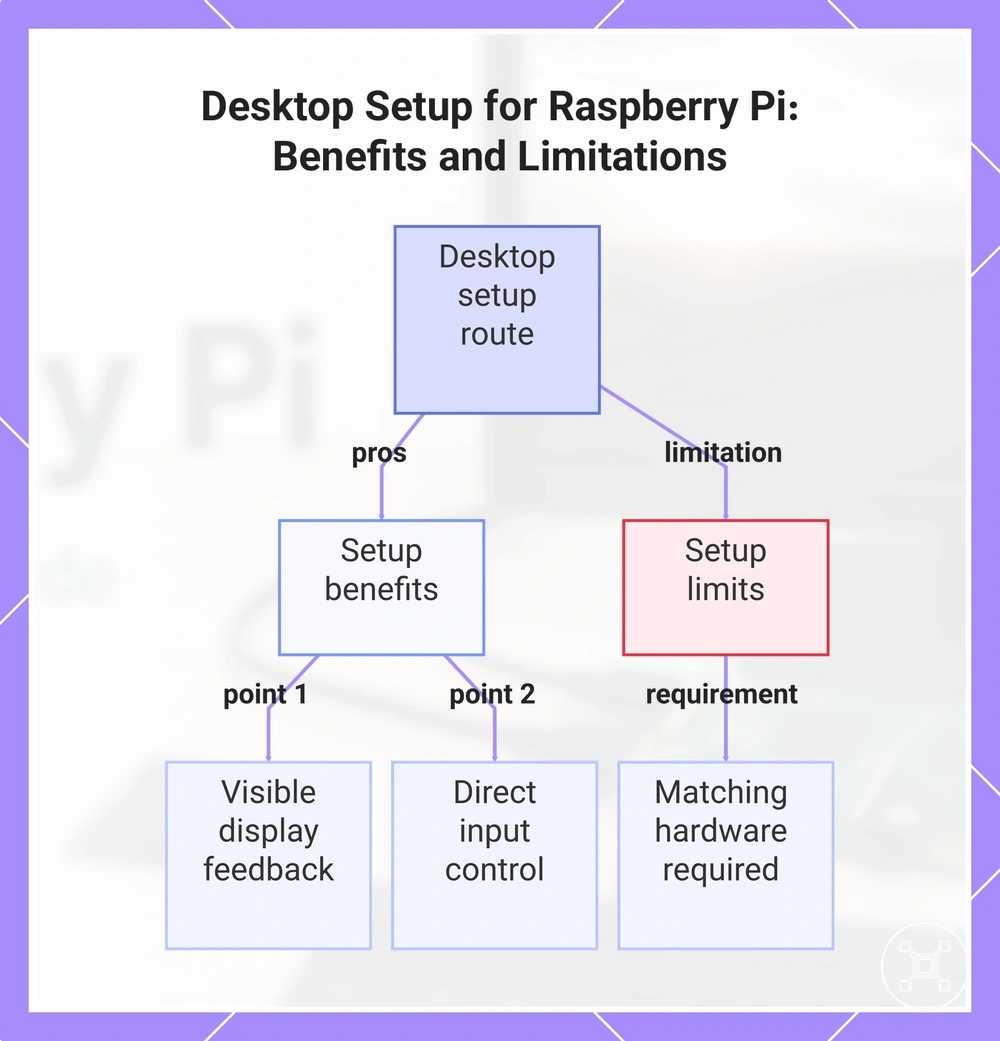
A desktop setup is usually the safer first setup route when a compatible monitor, keyboard, and mouse are available. The monitor provides visible display output, while the keyboard and mouse provide direct input for the first login and Wi-Fi setup. This local visibility helps the user confirm progress and recognise visible errors during first boot.
This local visibility helps the user confirm progress and recognise visible errors during first boot.
For a beginner, seeing the first boot process on the desktop screen reduces uncertainty because prompts, connection status, and setup errors remain visible. The main limitation is that this route requires display and input hardware that match the Raspberry Pi model and available ports.
Pros:
- Display output makes startup progress and visible errors easier to recognise.
- Keyboard and mouse input provides direct control during the first login.
- Wi-Fi setup remains visible, including prompts and connection confirmation.
- Local feedback gives a beginner clearer evidence that each setup stage has completed.
Limits:
- A monitor, keyboard, and mouse must be available for the local setup.
- The display connection and input devices must match the Raspberry Pi model and its available ports.
This chart shows the benefits and limitations of using a desktop setup with monitor, keyboard, and mouse for initial Raspberry Pi configuration.
Headless setup without a monitor or keyboard
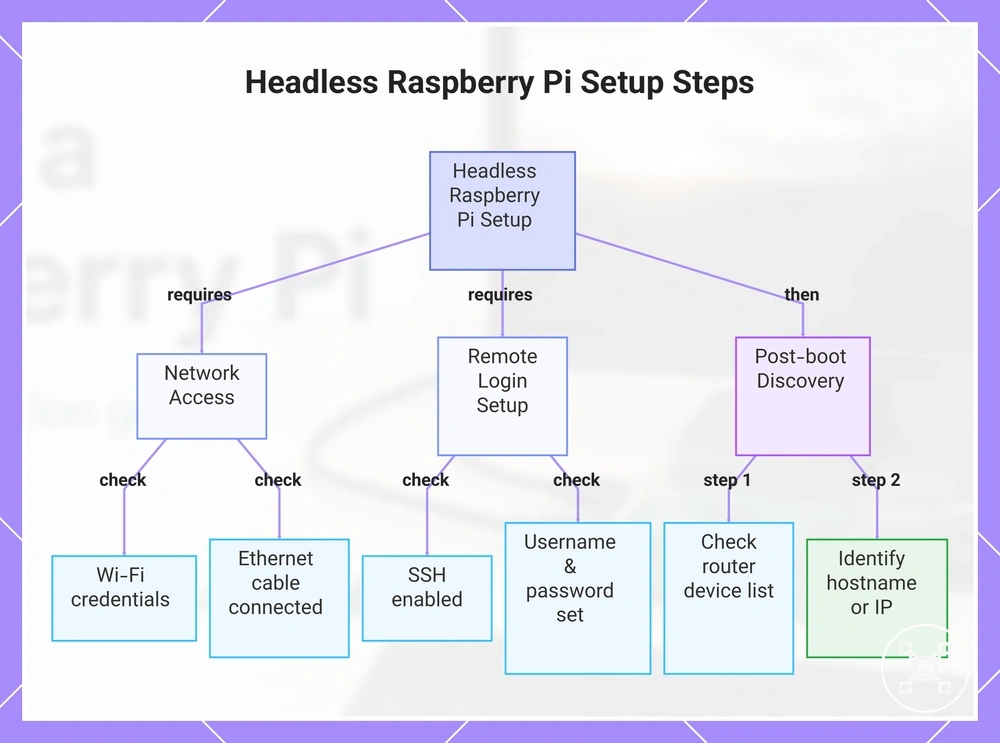
Headless setup can work without a monitor or keyboard when network access and remote login are prepared before first boot. Configure the Raspberry Pi to use the intended Wi-Fi network or an Ethernet connection, then enable SSH or another supported remote access method before startup. This setup path relies on the Raspberry Pi joining the expected network.
Confirm the following settings before first boot.
Missing Wi-Fi credentials, username, password, hostname, or remote access settings create most headless setup friction because the Raspberry Pi may boot without providing a usable login path. Ethernet can reduce wireless setup uncertainty when a wired connection is available, but the device must still be discoverable on the local network. Keep the login credentials private and use them only on a trusted network. Confirm the following settings before first boot.
- Wi-Fi: Prepare the network name and password in the operating system imaging tool so the Raspberry Pi can join the intended wireless network during first boot.
- Ethernet: Connect the network cable before startup when using a wired setup so the Raspberry Pi can request a local network address after boot.
- Username: Create the account name in the pre-boot configuration so remote login uses a known user account.
- Password: Set the account password in the pre-boot configuration so SSH or remote access can authenticate the login.
- SSH or remote access: Enable the selected remote login method in the operating system settings before first boot so access does not require a monitor or keyboard.
- Hostname: Set or confirm the hostname in the imaging configuration so the Raspberry Pi has a recognisable network name.
- Device discovery: Check the router or local network device list after startup to identify the Raspberry Pi hostname or device address before attempting remote login.
This chart shows the key pre-boot settings and post-boot steps required to set up a Raspberry Pi without a monitor or keyboard.
Prepare the boot media with Raspberry Pi Imager
The Raspberry Pi needs prepared boot media before it can load an operating system at first startup. Raspberry Pi Imager prepares a microSD card or other supported target storage by writing the selected operating system to it, making the boot media ready for use.
Follow these steps to prepare the boot media correctly.
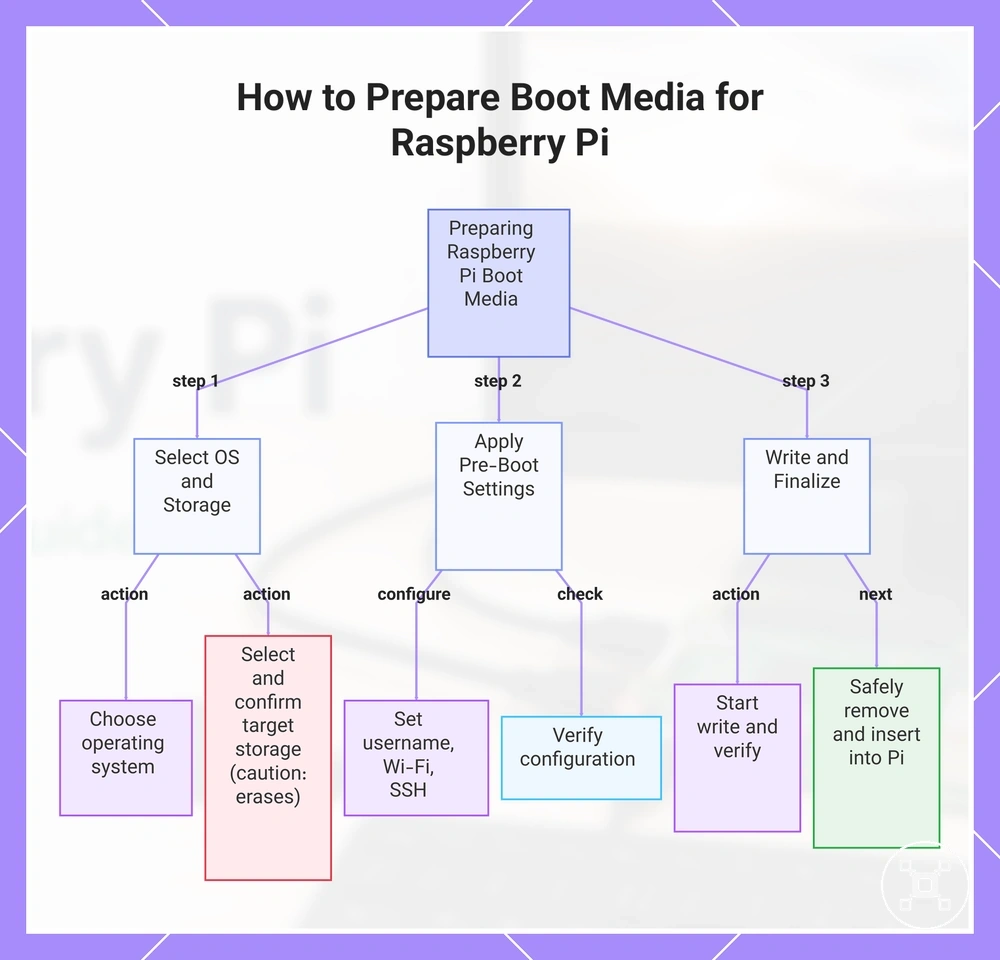
Use Raspberry Pi Imager to select the operating system, choose the correct target storage, complete the write image process, apply optional pre-boot settings if needed, and safely remove the boot media before inserting it into the Raspberry Pi. Follow these steps to prepare the boot media correctly.
- Select the operating system in Raspberry Pi Imager, confirm it matches your intended setup, and verify the correct OS is ready for writing.
- Select the target storage, confirm the correct microSD card or storage device is selected, and ensure the operating system will be written to the intended boot media.
- Apply optional pre-boot settings, such as a username, Wi-Fi, or SSH when required, verify the configuration, and prepare the system for the chosen setup path.
- Start the write image process, wait until writing and any available verification complete, and confirm the boot media is ready for first startup. For operating system choices and installation details beyond this preparation step, see install Raspberry Pi OS.
- Safely remove the boot media after the write process finishes, confirm the operating system has been written successfully, and insert the prepared card into the Raspberry Pi for startup.
Caution: Confirm that the selected target storage is the correct device before starting the write process because Raspberry Pi Imager erases the selected storage during preparation.
This chart shows the main steps to prepare a boot media for Raspberry Pi using Raspberry Pi Imager, including selection, settings, writing, and safe removal.
This chart shows the main steps to prepare a boot media for Raspberry Pi using Raspberry Pi Imager, including selection, settings, writing, and safe removal.
Choose Raspberry Pi OS for a beginner setup
For a beginner setup, you should usually choose the standard supported Raspberry Pi OS option. It provides the most straightforward balance of usability, desktop access, and support expectations for a first installation. Choose a different operating system only when your project has clear requirements that the standard option does not meet.
For a beginner setup, you should usually choose the standard supported Raspberry Pi OS option.
A desktop image includes a graphical desktop environment, making first-time setup and everyday use easier, while a lightweight image reduces installed software for projects that do not require a desktop interface. The desktop image is usually the simpler choice for beginners, whereas the lightweight image is better suited to focused project needs. Consider your Raspberry Pi model support and available storage size before selecting an operating system. For more guidance on Raspberry Pi operating systems, review the supported options before making your choice.
- Operating system: Raspberry Pi OS offers the standard supported option, helping beginners follow common setup guides and support resources.
- Desktop image: A graphical desktop improves usability during first boot and routine configuration.
- Lightweight image: Fewer installed components make it suitable when a desktop environment is unnecessary.
- Model support: Verify that the selected operating system supports your Raspberry Pi model to avoid setup problems.
- Storage size: Ensure the target storage has enough capacity for the selected operating system so the installation can complete successfully.
Write the system image to the microSD card
Writing the system image with Raspberry Pi Imager prepares the microSD card as boot media for the Raspberry Pi. The selected storage is erased during the write process before the OS image is written, so back up any files you want to keep before continuing.
- Select the correct device model in Raspberry Pi Imager and verify that it matches the Raspberry Pi you are preparing.
- Select the required OS or system image and verify that it matches your intended setup.
- Select the target storage containing the microSD card and verify its name and capacity before continuing.
- Start the write process after reviewing the device model, OS, and storage selections, then verify that the confirmation applies to the intended target device.
- Wait while Raspberry Pi Imager writes and verifies the system image, and continue only after verification completes successfully.
- Eject the microSD card using the safe removal option and verify that the storage is no longer in use before removing it.
Caution: Double-check the selected storage device before choosing Write because Raspberry Pi Imager erases all existing data on the selected target storage.
Set username, Wi-Fi, and remote access before boot
Configure the username, password, Wi-Fi, and remote access settings before first boot to reduce login and network setup friction. Desktop users can configure many of these options after startup, but pre-boot settings are especially useful for headless or Wi-Fi-first setups.
Checking these settings before writing the system image helps avoid unnecessary setup delays.
Incorrect login details or wireless network settings can prevent access during first boot, while leaving SSH disabled means remote access is unavailable until it is enabled later. Checking these settings before writing the system image helps avoid unnecessary setup delays. Review the following checklist before continuing:
- Username: Enter the intended account name so the correct login is available at first boot.
- Password: Create a password that matches the username so local or remote login can use the configured credentials.
- Locale: Select the correct country, language, and keyboard layout so regional settings and text input work as expected.
- Wi-Fi SSID: Enter the wireless network name exactly so the Raspberry Pi can identify the intended network during first boot.
- Wi-Fi password: Enter the matching network password so the Raspberry Pi can attempt to connect to the selected wireless network.
- SSH: Enable SSH when remote access is required before connecting a display so remote login is available after first boot.
- Hostname: Assign a unique device name so the Raspberry Pi is easier to identify on the local network.
Caution: Check the username, password, Wi-Fi SSID, Wi-Fi password, locale, and hostname for accuracy before writing the system image because incorrect settings can prevent login, network connection, or device discovery.
Connect the Raspberry Pi hardware for startup
Complete the Raspberry Pi hardware startup connections before applying power so the prepared storage, display connection, input devices, and network option are ready for first boot. Keep power last in the startup order.
An incomplete or misplaced connection can produce unclear boot symptoms, such as no display output, no input response, or no network access.
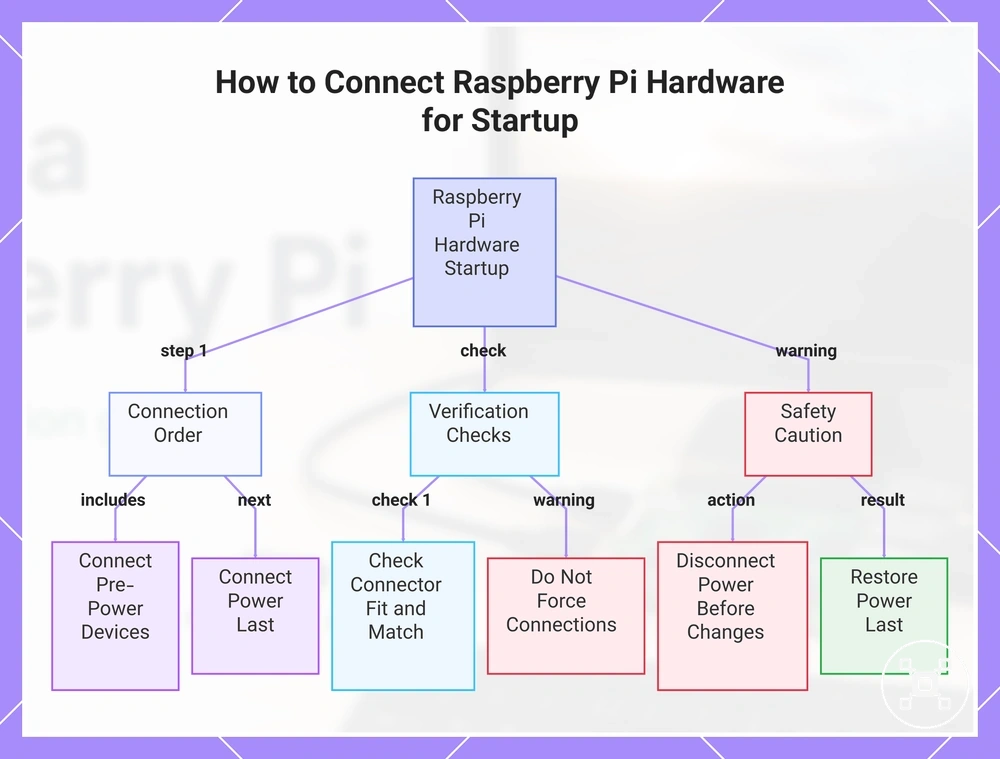
An incomplete or misplaced connection can produce unclear boot symptoms, such as no display output, no input response, or no network access. Check each connector against the Raspberry Pi model and use only ports that match the cable or peripheral; do not force a connector into place. Follow this startup order:
- Insert the prepared storage into the matching slot and check that the boot media is fully seated, so the Raspberry Pi can access the system image during startup.
- Connect the monitor to the appropriate HDMI display connection and check that the cable is secure at both ends, so display output is available during first boot when the selected model and monitor support the connection.
- Connect the keyboard and mouse to available USB ports and check that each plug is fully inserted, so local input is available when the startup screen appears.
- Connect the network option required for the setup and check that the wired cable is seated or that the prepared wireless settings are correct, so network access can be attempted during first boot.
- Make the power connection last and check that the supply connector matches the Raspberry Pi power port, so hardware startup begins only after the prepared storage and peripherals are connected.
Caution: Disconnect power before changing the prepared storage, display connection, keyboard, mouse, or network cable, then restore the power connection last.
This chart shows the recommended startup order and key precautions for connecting Raspberry Pi hardware before first boot.
This chart shows the recommended startup order and key precautions for connecting Raspberry Pi hardware before first boot.
Insert the prepared storage card
Insert the prepared storage card into the Raspberry Pi card slot before connecting power. Check that the microSD card orientation matches the card slot and press the card in until it is fully seated. The Raspberry Pi uses the prepared image on the boot media during first boot, so the card must be correctly inserted before startup.
- Confirm the prepared image has already been written to the microSD card before inserting it.
- Align the microSD card with the correct orientation for the card slot and insert it without forcing the card.
- Check that the microSD card is fully seated so it remains securely in the card slot during startup.
- If the card is unseated or the boot media is unprepared, the Raspberry Pi may not complete first boot.
For broader storage choices beyond this insertion step, see Raspberry Pi storage options.
For broader storage choices beyond this insertion step, see Raspberry Pi storage options .
Caution: If the microSD card does not slide into the card slot smoothly, remove it and verify the orientation instead of applying additional force.
Connect display and input devices
Connect the display, keyboard, and mouse before powering on the Raspberry Pi so the first boot is visible on the monitor and controllable through the input devices. Use the HDMI or micro-HDMI connector that matches the Raspberry Pi model, and confirm that every cable or adapter is fully connected. Complete these checks before startup.
- Connect the monitor to the Raspberry Pi with the correct HDMI or micro-HDMI connection, then confirm that the video cable is fully seated at both ends so display output can reach the monitor.
- Select the monitor display input that matches the connected HDMI port, then verify that the monitor is listening to the correct video source.
- Connect the keyboard to an available USB port, then check that the connector is fully inserted so keyboard input is available during first boot.
- Connect the mouse to an available USB port, then check that the connector is secure so pointer control is available during setup.
- If an adapter is required, confirm that it fits both the Raspberry Pi connector and the display cable so the video connection is complete.
- Troubleshooting: If no display appears or the keyboard or mouse does not respond, recheck the HDMI or micro-HDMI connection, selected display input, adapter fit, and USB connections before restarting.
Connect power last for a safe first boot
Connect power last because the power connection starts the Raspberry Pi boot process. Make sure the storage is ready, peripherals are connected, and the power supply uses a suitable power adapter with the correct cable fit for the Raspberry Pi model before startup. This order supports a safe startup and reduces avoidable setup interruptions.
This order supports a safe startup and reduces avoidable setup interruptions.
An unstable power supply or an unsuitable power adapter can produce symptoms that resemble storage or boot problems during first boot. If the boot indicator behaves unexpectedly after power is connected, first check the power connection, cable fit, and adapter suitability for the Raspberry Pi model before assuming the storage is faulty. After these local safety checks, see Raspberry Pi power requirements for model-specific guidance.
- Prepare the storage and connect all peripherals, then confirm they are ready before connecting the power supply.
- Connect the power supply with a suitable power adapter and check that the power cable is fully seated to support stable startup.
- Watch the boot indicator after applying power and confirm that startup begins before changing any connections.
- Avoid unplugging the power connection during startup unless power must be removed safely to reduce the risk of interrupting the boot process.
Caution: Unstable power can imitate storage or boot problems, so verify the power supply, power adapter, and cable connection before troubleshooting other startup components.
Complete the first Raspberry Pi OS startup
The Raspberry Pi OS first startup is complete when login, the account, region settings, network connection, and update readiness are confirmed. This first startup verifies that the prepared storage and connected hardware are working together. When these checks are complete, the Raspberry Pi is ready for basic use.
When these checks are complete, the Raspberry Pi is ready for basic use.
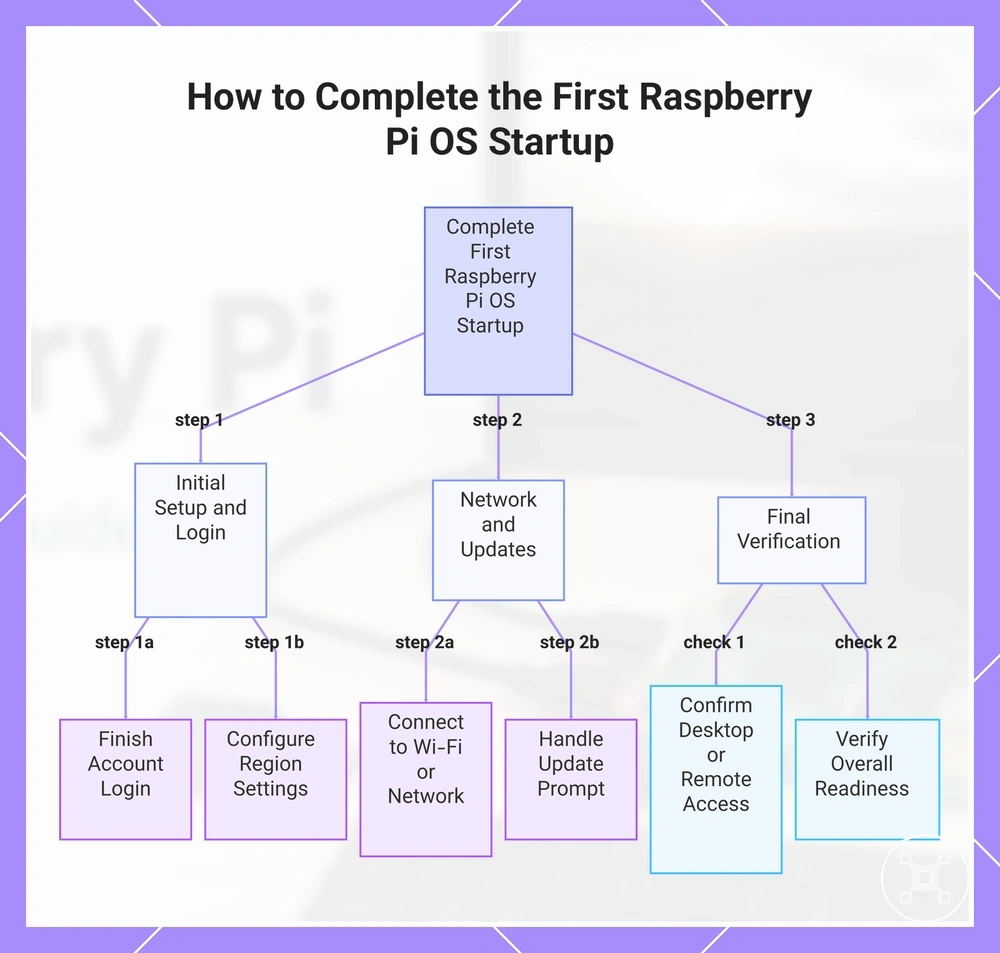
First-run prompts can differ depending on the setup path and the Raspberry Pi OS state. A desktop installation may display a startup wizard, while a headless setup can present different confirmation steps after internet access becomes available. Use the following steps to complete the initial settings and confirm that the system is ready.
- Complete the account setup and finish the first login, then confirm that the desktop or the next setup screen opens successfully.
- Review the region settings, including the keyboard layout and timezone if prompted, then verify that the selected settings match your location.
- Connect to Wi-Fi or another available network, then confirm that internet access is available before continuing.
- Respond to the update prompt if it appears, then wait until the update check or skip confirmation is complete before proceeding.
- Confirm that the desktop loads normally, or verify that remote access is available if your setup uses a headless configuration, then check that Raspberry Pi OS is responsive.
- Verify that login, network access, and update readiness are complete, then use the working desktop or remote access as the confirmation that the Raspberry Pi is ready for basic use.
This chart shows the main steps to finish the initial setup, including account login, region settings, network connection, and final verification.
Initial account, region, and desktop settings
Complete the initial account, region, and desktop settings so the first login is usable and correctly matched to your location. Set the account details, regional settings, and desktop settings shown during the first setup, then confirm they reflect how you plan to use Raspberry Pi OS. Accurate country, language, keyboard layout, and timezone settings help keep keyboard input correct and can affect Wi-Fi behavior during first setup.
- Set the username for the account, then confirm it is accepted so the first login can continue.
- Create and confirm the password, then verify that the account is ready for login.
- Select the correct country and language, then check that menus and regional settings match your location.
- Choose the correct keyboard layout, then test key input to confirm that typed characters match the selected layout.
- Set the timezone, then verify that the displayed local time matches your region for correct system timing.
- Adjust display scaling to a comfortable size, then confirm that desktop text and interface elements are easy to read.
Connect to Wi-Fi and confirm internet access
Wi-Fi setup is complete when the Raspberry Pi joins the selected network and can reach an online service or update source. After the first boot, confirm that the correct Wi-Fi connection is active and that internet access is available before continuing with the setup. A successful update check or access to an online service confirms the connection.
Use the checks below to verify the connection.
If the connection does not complete, the cause is often an incorrect SSID, an incorrect password, weak signal strength, or a country setting that does not match your location. Desktop and headless setups use different connection methods, but both should confirm the same network outcome. Use the checks below to verify the connection.
- Select the correct SSID, then confirm that the Raspberry Pi joins the intended network before continuing.
- Enter the correct password, then verify that the Wi-Fi connection remains connected instead of requesting the password again.
- Check signal strength; if the signal is weak because of router distance or obstacles, move closer or improve placement, then confirm that the connection remains stable.
- Verify the country setting, then confirm that the wireless region matches your location so Wi-Fi behaviour and network detection remain correct.
- If Wi-Fi is unavailable, use Ethernet fallback, then confirm internet access by reaching an update source or another online service.
Update the system after first login
Update Raspberry Pi OS after the first login and once the Raspberry Pi is online to bring the fresh installation into line with current packages and fixes. Wait for the update to reach completion before continuing with the setup. Reboot only if the update prompt requests it.
- Open the update prompt after the first login, then confirm that the Raspberry Pi is online before starting the package update.
- Run the update for the available packages, then wait until Raspberry Pi OS reports that the process has reached completion.
- Check that no package update is still running, then confirm the system is ready for the next setup task.
- If Raspberry Pi OS requests a reboot, restart the system and continue only after the desktop or login screen is available again.
First-setup problems that block startup or connection
Setup problems during the first boot are usually easier to resolve by matching each symptom to its likely setup condition. Check power, the microSD card, display, keyboard, mouse, or Wi-Fi before repeating the setup process. Use the diagnostic checklist below to identify the first check and the appropriate next action.
Use the checklist below to decide the next step.
Retry the setup when the problem is linked to a temporary setup condition, such as an incorrectly seated microSD card, an incorrect Wi-Fi password, or the wrong monitor input. Move to deeper troubleshooting only if the same symptom remains after the first check has been completed. This helps distinguish normal setup problems from persistent boot or connection issues. Use the checklist below to decide the next step.
| Symptom | Likely setup cause | First check | Next action |
|---|---|---|---|
| Not booting | Power supply or microSD card issue | Confirm the power supply is connected correctly and the microSD card is fully inserted. | Retry the first boot. If the symptom remains, continue with dedicated boot troubleshooting. |
| No display | Display connection or monitor input | Check the HDMI cable, any required adapter, and the selected monitor input. | Restart the Raspberry Pi after confirming the display connection. |
| Keyboard or mouse not responding | Input device not detected | Reconnect the keyboard or mouse and confirm the connection. | Retry the setup after the input device responds. |
| Wi-Fi connection problem | Incorrect password or country setting | Verify the Wi-Fi password and country setting. | Retry the wireless connection or use Ethernet fallback to complete the setup. |
If the basic diagnostic checklist does not resolve the problem, continue with the Raspberry Pi not booting guide for more detailed boot diagnostics.
Boot, SD card, and power checks
When a Raspberry Pi does not start as expected, begin the boot checks by inspecting the microSD card and power supply because boot failure often relates to storage preparation or power stability. Check the boot media, power connection, and startup behaviour before assuming a larger boot problem. Use the diagnostic table below to match each symptom with its likely attribute issue and first check.
| Symptom | Likely attribute issue | Check | What it means |
|---|---|---|---|
| No activity | Power supply or loose cable | Confirm the power supply is connected securely and the cable is fully seated. | The Raspberry Pi may not be receiving stable power. |
| Repeated restart | Weak adapter or unstable power | Reconnect the power supply and confirm the adapter is suitable for the setup. | The symptom is consistent with an unstable power condition. |
| No boot after write | Unprepared microSD card, corrupt write, or wrong storage selection | Confirm the microSD card contains a prepared image and that the correct boot media was written successfully. | A storage issue can prevent the Raspberry Pi from starting. |
| Warning indicator | Possible power or boot condition | Check the warning indicator together with the power connection and boot media. | The indicator points to a startup condition that should be checked before deeper troubleshooting. |
If these basic boot checks do not resolve the problem, continue with the Raspberry Pi not booting guide for more detailed boot troubleshooting.
Display, keyboard, mouse, and Wi-Fi checks
When a Raspberry Pi boots but cannot be controlled or connected properly, begin with a display check, input devices, and network conditions because first-setup success depends on visible output, working controls, and network access. Check the display, keyboard, mouse, and Wi-Fi before assuming a larger setup problem. Use the local checks below to match each symptom with the appropriate check and likely outcome.
Check the display, keyboard, mouse, and Wi-Fi before assuming a larger setup problem.
If a headless setup cannot be reached, first verify that the pre-boot Wi-Fi and remote-access settings were prepared correctly before investigating other network conditions.
- No display output: Check the selected display input and ensure the HDMI cable is connected securely. Correcting the display connection can restore screen output when the Raspberry Pi has already booted.
- No display with an adapter: Check that the adapter matches the display connection in use. An unsupported adapter can prevent video output even if the Raspberry Pi starts normally.
- Keyboard not responding: Check that the keyboard is connected securely through USB. A working connection restores local input control.
- Mouse not responding: Check the mouse connection and reconnect it if necessary. Local control is more likely once the input device is detected.
- Wi-Fi not connecting: Check the Wi-Fi password and enter it again if necessary. An incorrect password prevents the wireless connection.
- Wireless network unavailable: Check the selected country setting. An incorrect country setting can prevent the expected Wi-Fi network from appearing.
- Weak Wi-Fi signal: Move closer to the access point or use Ethernet fallback. A more stable network path improves initial network access.