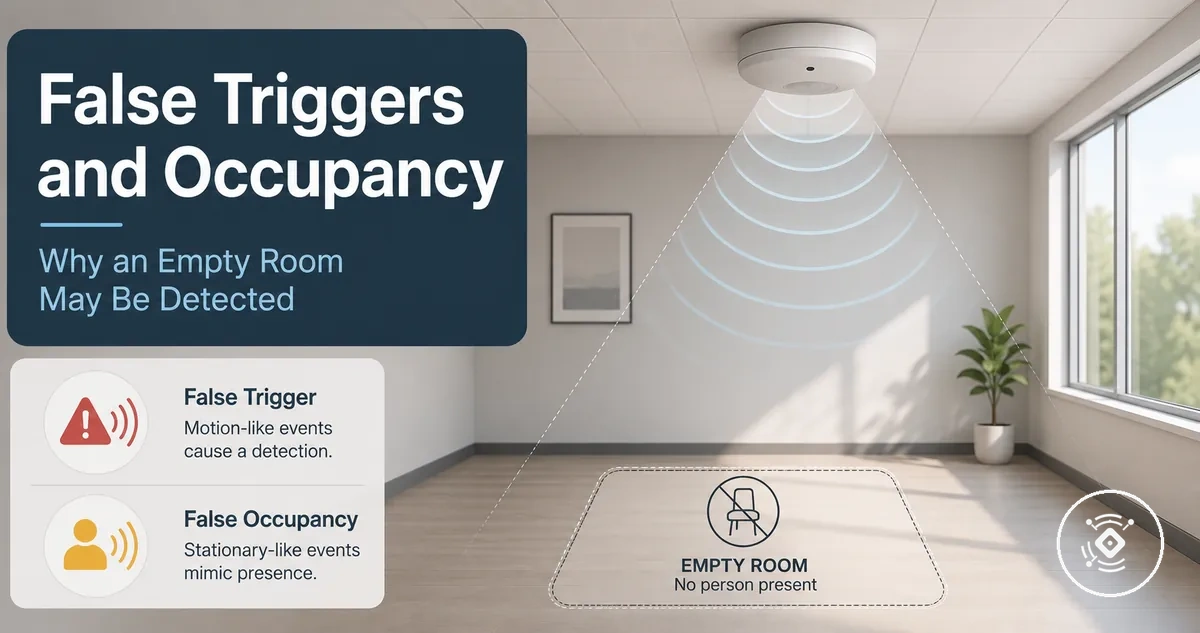
mmWave Presence Sensor False Triggers and False Occupancy
A mmWave presence sensor may report presence even when an empty room should appear unoccupied. The radar return can be real while still creating false occupancy because the detected signal does not match the intended monitored room state.
False positives do not necessarily indicate a hardware fault. They may result from the relationship between radar behavior, room conditions, placement, detection zone, sensitivity, calibration, or through-wall detection. Understanding these diagnostic variables helps separate the reported occupancy state from the conditions that may be influencing it.
An empty room that remains marked as occupied or repeatedly activates an automation trigger is a common example of phantom presence. Before assuming a fault, it is useful to consider where and when the reported occupancy occurs, because the underlying cause may relate to placement, reflective surfaces, adjacent spaces, or current sensor configuration rather than a failed device.
The exact cause and appropriate response can vary with room layout, mounting angle, detection range, firmware, and calibration state. For that reason, false triggers are best approached as a troubleshooting issue that requires evaluating the sensing environment before changing settings or considering replacement.
What false triggers mean in mmWave presence detection
A false trigger is a reported presence event in mmWave presence detection when the intended monitored area should be empty. The mmWave sensor reports an occupied state even though the monitored zone does not match the intended room-level outcome. A false trigger is therefore defined by the mismatch between the reported presence state and the intended monitored area.
What false triggers mean in mmWave presence detection is illustrated in the diagram below, which labels the difference between the room's actual state and the reported occupancy.
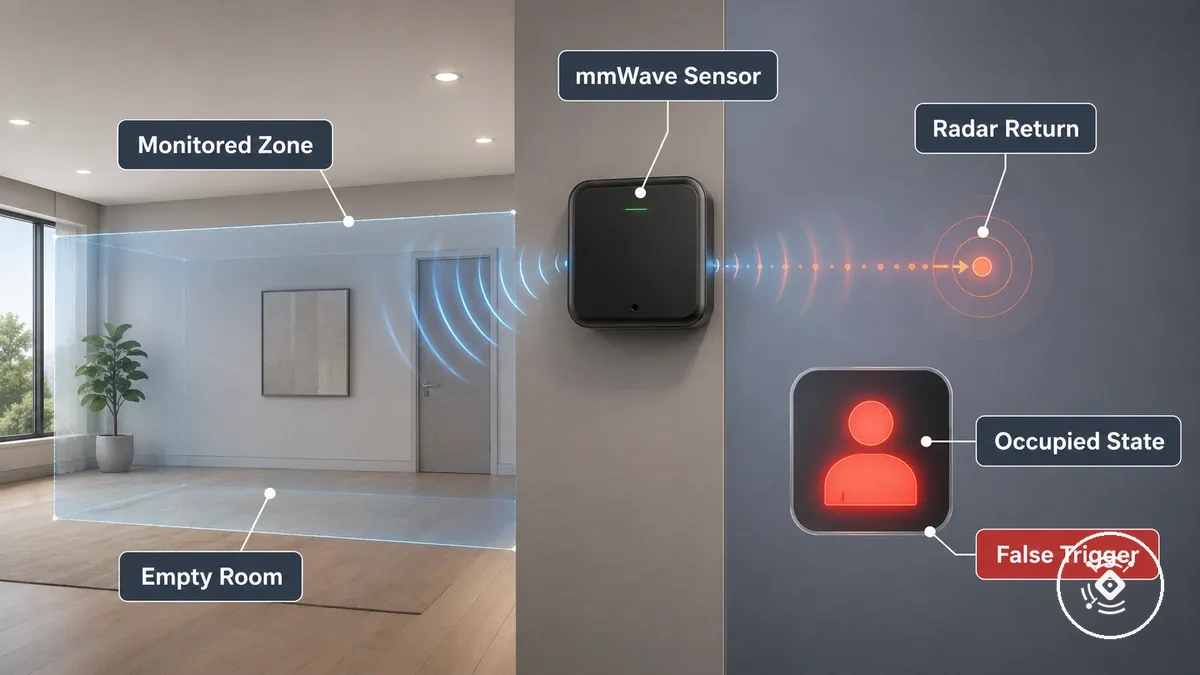
A false trigger does not necessarily mean the radar return is incorrect or that the mmWave sensor has failed. A movement signal may satisfy the detection threshold while still producing false occupancy when the reported presence does not represent the intended monitored zone for room-level automation. For broader context about the technology, see the mmWave presence sensor hub. More specific causes are covered in later troubleshooting sections.
The comparison below separates normal detection from false occupancy.
| Detection pattern | What it means |
|---|---|
| Presence reported within the intended monitored zone | The occupied state matches the expected room-level outcome. |
| Presence reported while the intended monitored area should be empty | The result is false occupancy, even if the radar return may be technically real for a condition outside the intended monitored area. |
False occupancy versus missed occupancy
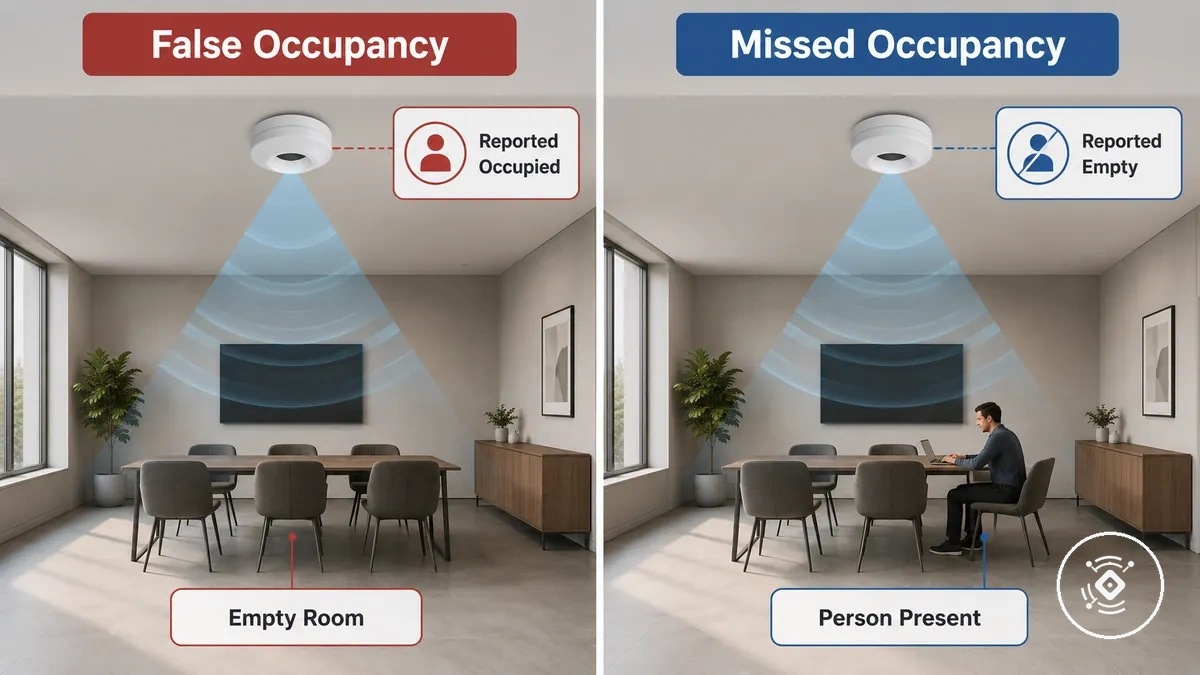
False occupancy versus missed occupancy describes two opposite occupancy errors. False occupancy means the sensor is reported occupied when the actual room condition is an empty room, while missed occupancy means the sensor is reported empty when a person is present. The comparison below contrasts these two error directions by matching the reported state with the actual room condition and the possible automation effect.
False occupancy versus missed occupancy is illustrated below by comparing the sensor report with the actual room condition.
| Error type | Sensor report | Actual room condition | Typical automation effect |
|---|---|---|---|
| False occupancy | Reported occupied | Empty room | Automations, such as lighting, may remain active longer than intended. |
| Missed occupancy | Reported empty | Person present | Automations, such as lighting, may switch off while the room is still occupied. |
Symptoms of phantom presence in an empty room
When a sensor reports presence after the intended monitored area appears empty, phantom presence is an observable symptom rather than proof of a specific cause. The visible behaviour is the starting point for diagnosis. Symptoms of phantom presence in an empty room help identify what the sensor is reporting before possible causes are investigated.
Symptoms of phantom presence in an empty room are easier to recognise by comparing the reported occupancy state with what is actually happening in the room. The image below illustrates this situation, and the checklist highlights common observations that may indicate where to investigate. These signs should be treated as evidence-gathering cues rather than confirmation of a particular cause.
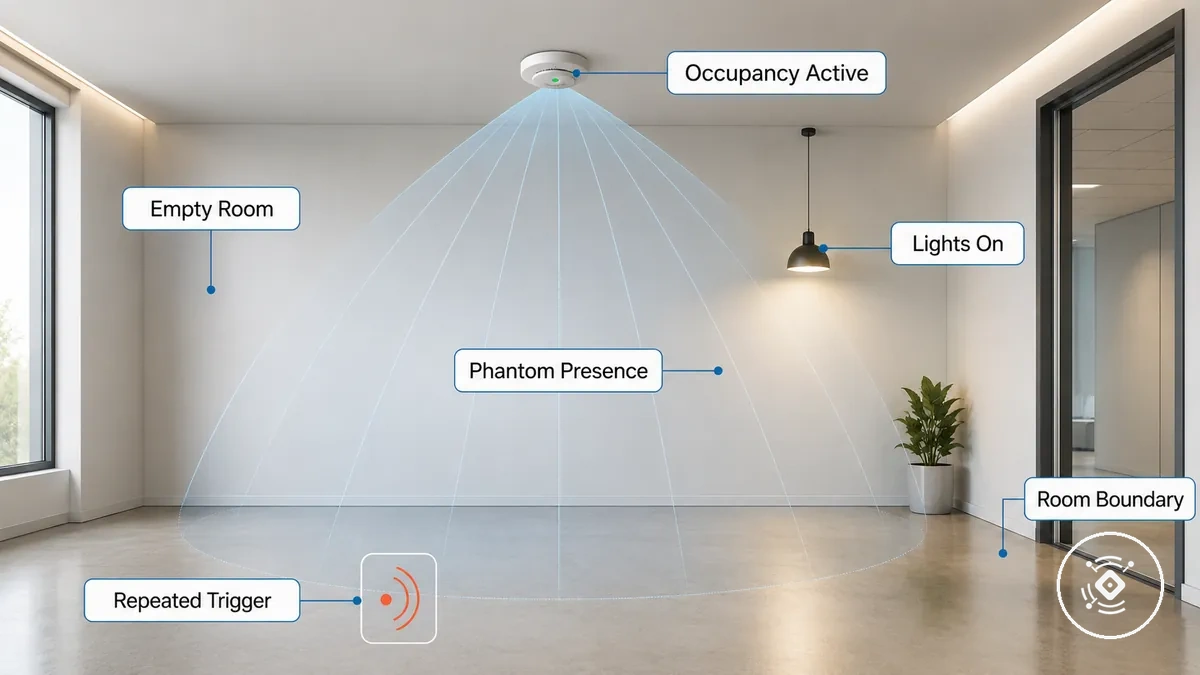
- Lights staying on after the room has been vacated, which may indicate that the occupancy state is not clearing.
- Repeated triggers occur even though the intended monitored area appears empty, suggesting a false occupancy symptom that requires further observation.
- Delayed vacancy keeps the occupancy state active longer than expected, making the timing of the report worth checking.
- Presence reports repeatedly appear near a doorway or wall, which may indicate that the room boundary should be examined.
- Detection appears to coincide with an active object, such as a fan or moving curtain, without confirming that the object is the cause.
- Occupancy reports change when a pet, reflective surface, or adjacent movement is nearby, providing a useful diagnostic clue rather than proof of a specific explanation.
Common causes of mmWave false positives
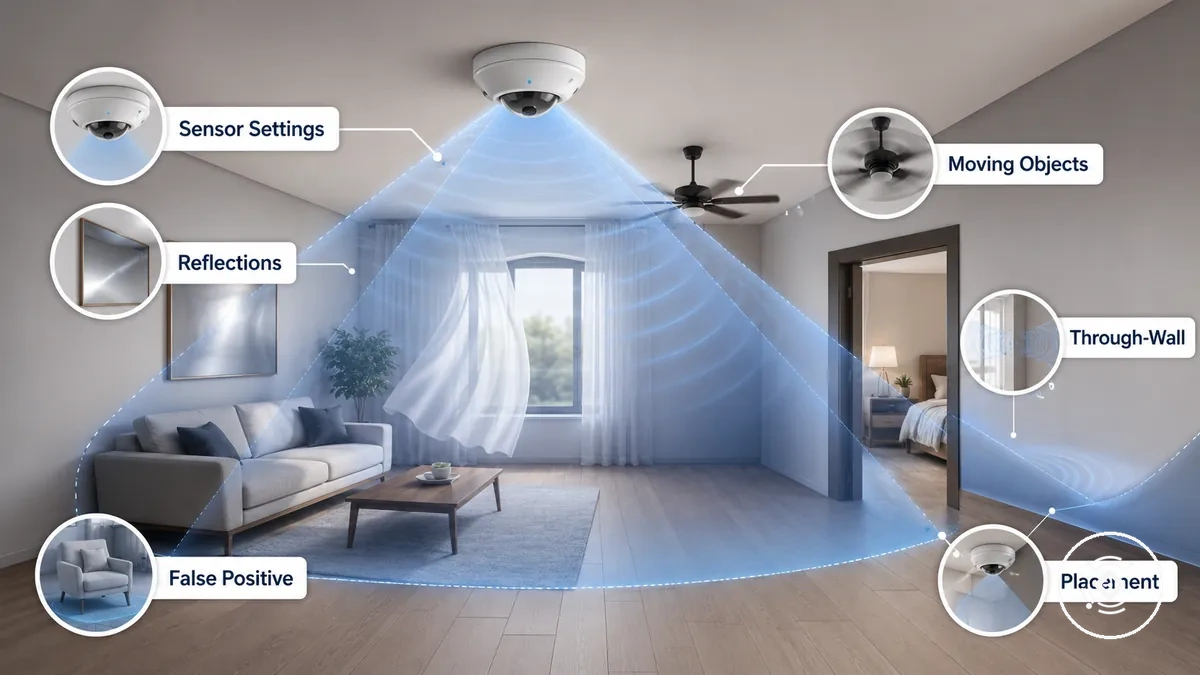
When mmWave false positives occur, the underlying cause usually belongs to one of a few diagnostic groups rather than a single fault. Common causes of mmWave false positives typically cluster around sensor settings, room physics, moving objects, through-wall detection, and placement. These groups help classify the source of a false occupancy risk before any setup changes are considered.
Common causes of mmWave false positives are easier to understand when each cause family is linked to its signal effect instead of assuming a definitive explanation. Sensitivity, detection range, reflections, moving objects, placement, calibration, and through-wall detection may each contribute to occupancy errors depending on the room and sensor configuration. The diagram below groups these cause families by where the false signal may originate, while the table organizes them by signal condition and an appropriate first check.
| Cause family | Signal condition | What it may trigger | First check |
|---|---|---|---|
| Settings | Sensitivity, detection range, or calibration may not suit the monitored area. | Weak movement may increase false occupancy risk. | Review sensor settings in relation to the room. |
| Reflections | Reflective surfaces may alter the radar return. | Unexpected signals may create occupancy errors. | Observe nearby reflective surfaces and signal paths. |
| Movement | Moving objects, such as a fan, curtain, or appliance vibration, may be detected. | False triggers may occur while movement continues. | Compare reported occupancy with nearby movement. |
| Through-wall spillover | Signals may extend beyond a wall or into an adjacent room. | Presence outside the intended area may be reported. | Check for activity beyond the room boundary. |
| Placement | Sensor angle or line of sight may include unintended areas. | Detection may extend beyond the intended coverage. | Confirm the mounting direction and monitored area. |
Sensitivity and detection range set too broadly
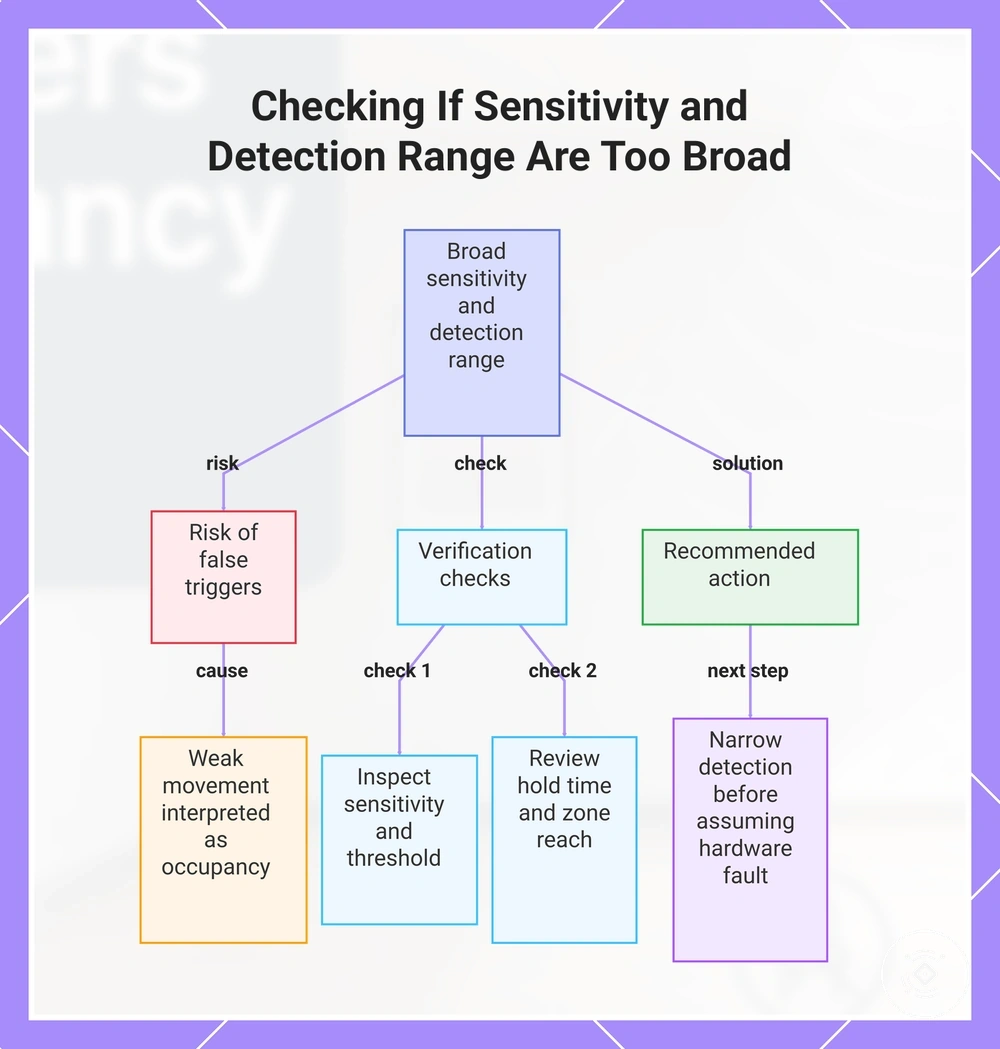
Sensitivity and detection range set too broadly can allow weak movement or a distant return to be interpreted as occupancy, which may contribute to a false trigger. A high setting value does not necessarily indicate a hardware problem because the outcome depends on the monitored area, the detection threshold, and room conditions. Broad zone reach can therefore increase the likelihood of detecting movement beyond the intended boundary.
The checklist below tests whether sensitivity and detection range are broader than needed by reviewing detection distance, threshold, hold time, and zone reach. Verifying these observations before changing settings can help determine whether the reported occupancy is linked to configuration rather than hardware behaviour.
- Check whether sensitivity is high enough to register weak movement that is not intended to count as occupancy.
- Observe whether the detection range includes a distant return from outside the intended zone reach.
- Compare the occupancy state with the configured hold time to determine whether delayed vacancy is contributing to the false trigger.
- Review whether the detection threshold responds to minor movement near the room boundary or adjacent movement.
Narrowing detection is usually tested before assuming hardware failure because reducing unnecessary zone reach may help distinguish false triggers from valid presence reports. For broader selection criteria, see sensitivity and detection zones.
This chart shows the risks of overly broad sensitivity and detection range and the verification steps to determine if settings cause false triggers.
Reflections from walls, furniture, glass, and hard surfaces
Reflections from walls, furniture, glass, and other hard surfaces can redirect radar energy and create confusing presence returns when room layout, sensor angle, distance, or sensitivity affects the signal path. A reflective surface does not automatically cause false occupancy, but it may alter the radar reflection path and detected return strength under certain conditions. These redirected paths can make the resulting trigger appear inconsistent.
A glass panel near a wall, mirror, cabinet, or furniture edge may redirect radar energy before the signal returns to the sensor. Depending on the sensor angle, room layout, distance, sensitivity, and return strength, that reflected return may be interpreted differently from a direct path. Reflection-related triggers can therefore look random even when the underlying source remains spatially consistent.
Fans, curtains, appliances, and small moving objects
When non-human movement occurs inside the monitored area, the occupancy signal may be influenced if the sensor detects repeated micro-motion rather than a person. Observation should come before diagnosis because moving sources are possible contributors, not automatic causes of a false trigger. Fans, curtains, appliances, and small moving objects are grouped below by motion type to help identify potential signal sources.
- Fan oscillation: Repeated sweeping movement may generate micro-motion. Observe whether occupancy reports follow the fan's operating pattern.
- Curtain movement: Airflow may move curtains within the monitored area. Check whether detection changes only while the fabric is moving.
- Appliance vibration: A vibration source may contribute to a detectable radar return under certain conditions. Compare occupancy reports with appliance operation before treating it as the source.
- Pet movement: Animal movement inside the monitored area may influence the occupancy signal. Observe whether reports occur only while the pet is active.
- Plant movement and other small moving objects: Leaves or lightweight objects may create repeated micro-motion. As a confirmation example, temporarily isolating or removing the moving source can help determine whether the occupancy reports change.
Through-wall detection from adjacent rooms or corridors
Through-wall detection can contribute to false occupancy when movement outside the intended room is detected beyond a wall, doorway, or room edge. Whether this occurs depends on wall material, distance, sensor angle, zone settings, and signal spillover rather than every installation behaving the same way. Under these conditions, outside-room movement may appear as occupancy inside the monitored space.
For example, movement in an adjacent room or a person walking along a corridor may be reported if signal spillover extends beyond the intended zone boundary through a doorway or under suitable wall and distance conditions. This does not necessarily indicate a faulty sensor, because the reported occupancy may result from boundary detection rather than in-room activity. For broader context on this behaviour, see through-wall detection issues.
Placement conditions that increase false triggers
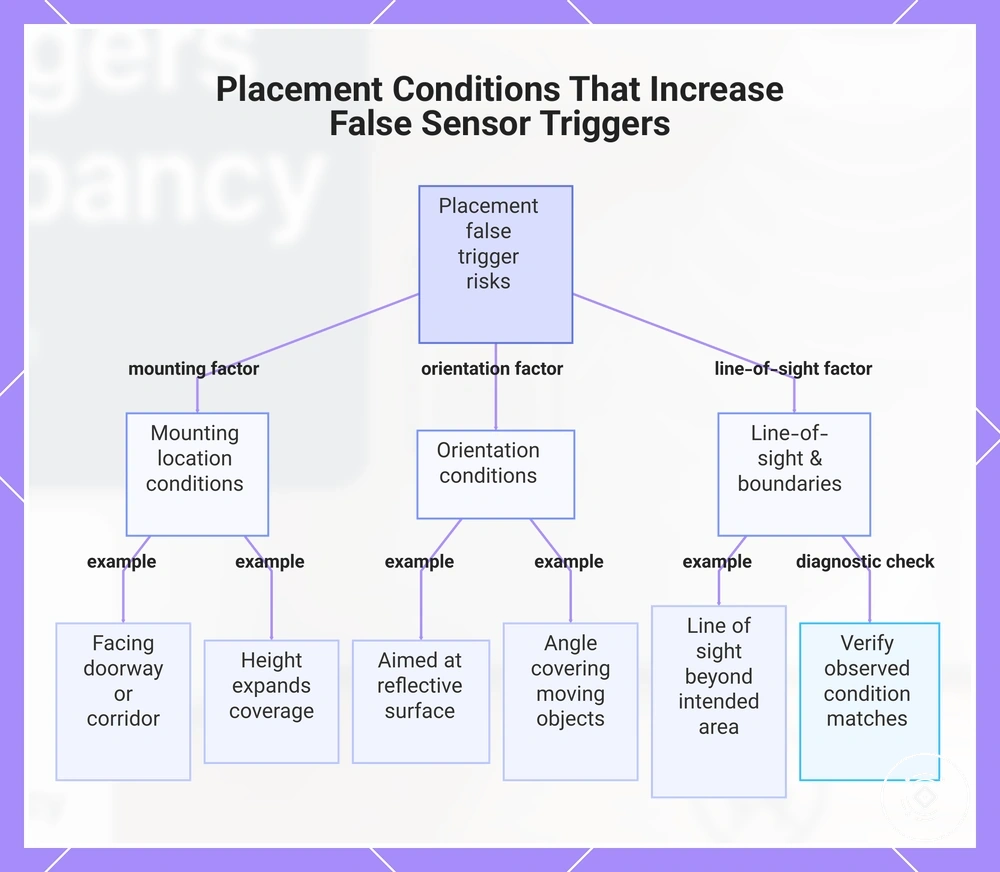
Placement can increase false triggers even when the sensor is functioning normally. Mounting location and orientation influence the detection path, line of sight, and room boundary coverage, which may increase the likelihood of false occupancy under certain conditions. Mounting location and orientation should therefore be treated as risk multipliers during troubleshooting.
Before changing settings, inspect whether the sensor's line of sight extends beyond the intended monitored area. Placement conditions that increase false triggers are easier to diagnose by checking angle, height, line of sight, and room boundaries rather than assuming a hardware fault. Ceiling versus wall mounting may change false-trigger risk when the mounting angle exposes different room boundaries or active areas, depending on the installation.
- A mounting location facing a doorway or corridor may include adjacent movement in the detection path.
- An orientation aimed at a reflective surface may expose the sensor to altered radar returns.
- A sensor angle covering moving objects may increase the chance of unintended detection.
- A line of sight extending past a doorway or room boundary may include activity from an unintended space.
- A mounting height that expands coverage toward an active area edge may increase false-trigger risk.
- A placement change is better supported when an observed room-boundary or line-of-sight condition matches the false trigger. See placement-related false triggers for deeper placement guidance.
This chart shows the main placement factors (mounting location, orientation, and line-of-sight) that can increase false occupancy triggers, along with a diagnostic verification step.
Settings that reduce false triggers without losing useful detection
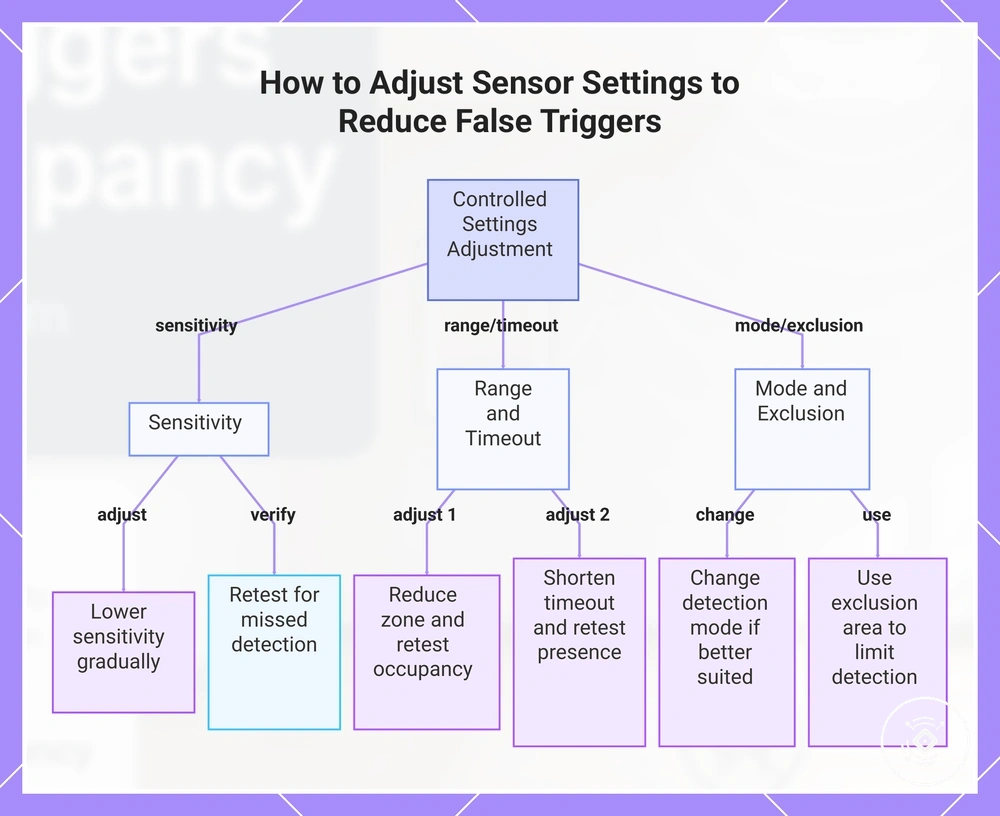
Reducing false triggers starts with controlled settings adjustments rather than changing multiple variables at once. Settings may lower false positives while trying to preserve useful detection, but the result depends on the room, sensor model, firmware, and current configuration. Each adjustment should therefore be made and tested individually before another setting is changed.
Settings that reduce false triggers without losing useful detection require balancing fewer false positives against the risk of missed detection. Sensitivity, distance, zone coverage, timeout, detection mode, and an exclusion area may each affect occupancy reporting differently. Make one controlled adjustment, observe the occupancy response, and retest before deciding whether another change is needed. For broader guidance on controlled tuning, see calibration and settings.
- Lower sensitivity gradually when weak movement appears to cause false triggers, then retest for any increase in missed detection during normal occupancy.
- Reduce the distance or monitored zone when detection extends beyond the intended area, then confirm that expected occupancy is still detected.
- Shorten the timeout when delayed vacancy keeps the occupancy state active longer than intended, then retest whether normal presence remains stable.
- Change the detection mode only when another available mode appears better suited to the room, then verify that valid occupancy remains detectable.
- Use an exclusion area, where available, to limit detection near a room boundary or outside-room movement, then retest for both false occupancy and missed detection.
- Stop adjusting when false triggers decrease without a noticeable loss of useful detection. If the trigger pattern remains unchanged, move to a deeper diagnostic check rather than continuing to tune settings.
This chart shows the controlled adjustment process for reducing false occupancy triggers while preserving useful detection, focusing on key settings and their specific adjustments.
Sensitivity, distance, and presence timeout adjustments
Sensitivity, distance, and presence timeout affect detection persistence and the balance between false occupancy and missed presence. Their effect varies by sensor model, room size, normal use pattern, and detection goal, so no single adjustment direction suits every setup. Sensitivity, distance, and presence timeout adjustments are compared below as separate local tuning levers by behaviour change and risk.
| Setting | Value or condition | False-trigger risk | Adjustment cue |
|---|---|---|---|
| Sensitivity | A high value may register weaker movement, while a low value may ignore useful motion. | Higher sensitivity may increase false occupancy; lower sensitivity may increase missed presence. | Reduce gradually when weak movement appears linked to false triggers, then retest normal occupancy. |
| Distance | A broad range limit may include adjacent movement, while a shorter limit may reduce coverage. | Greater distance may detect activity beyond the intended area; shorter distance may miss expected presence near the room edge. | Narrow the range when distant activity matches the trigger pattern, then confirm useful detection remains. |
| Presence timeout | A long hold time increases detection persistence, while a short timeout clears the occupancy state sooner. | A long timeout may create delayed vacancy; a short timeout may increase missed presence during limited movement. | Shorten the timeout when occupancy remains active too long, or lengthen it when valid presence clears too quickly, then retest. |
Zone exclusion and room boundary calibration
Zone exclusion and room boundary calibration help focus detection on the intended occupied area by separating spaces that should remain active from spaces that may contribute to false occupancy. The active zone should retain normal sitting, standing, and working areas, while each excluded zone should have a clear boundary reason based on room layout, sensor capability, and calibration state. The steps below separate included areas from excluded areas without assuming that one zone layout suits every room.
- Keep normal occupancy areas inside the active zone so expected sitting, standing, or working activity remains detectable.
- Set an excluded zone near a doorway when movement beyond the room may enter the detection area and contribute to false occupancy.
- Use the wall line as a room boundary reference when zone reach appears to extend beyond the intended space, then retest the calibration state.
- Limit coverage near a corridor edge when outside movement matches the false-trigger pattern, while preserving useful detection inside the room.
- Review a furniture area before excluding it, because the area may belong in the active zone if normal occupancy occurs there.
- Retest after each boundary adjustment to confirm that outside-room detection may be reduced without removing normal occupied areas from coverage.
How to test whether the room, setup, or sensor is causing the trigger
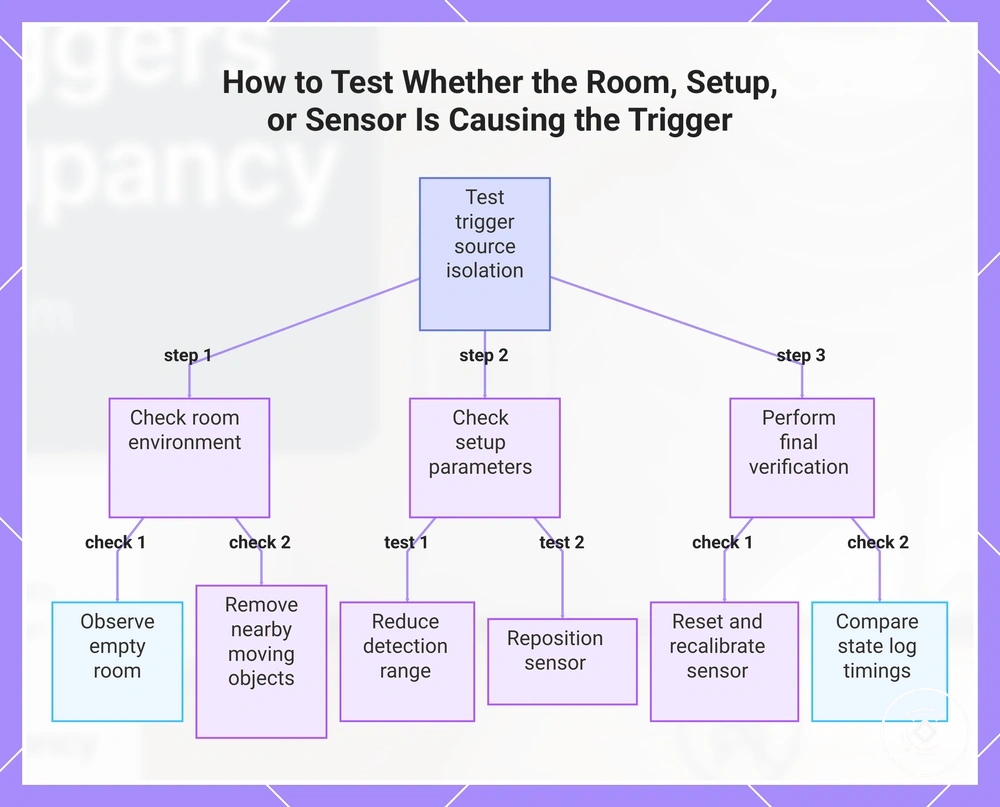
How to test whether the room, setup, or sensor is causing the trigger requires a diagnostic method that isolates one possible source at a time. Evidence should come from repeatability, trigger timing, physical location, and controlled changes rather than an immediate assumption of sensor fault. This separates the most likely room cause, setup cause, and possible sensor fault before conclusions are drawn.
Use one controlled change at a time so each result can be compared with the previous behaviour. A repeatable change in the false state is more useful than a single event because it helps show which condition influenced the trigger. If a state log is available, it may provide supporting evidence, although availability depends on the device or integration. The ordered flow below isolates the most likely trigger source.
- Begin with an empty-room observation. Record the trigger timing, physical location, and whether the false state appears without intended movement. Repeatable behaviour may suggest a room cause or setup cause that needs isolation.
- Temporarily remove or stop nearby moving objects. Observe whether the false state disappears after this controlled change. If it does, an environmental room cause becomes more likely.
- Temporarily reduce the detection range and narrow the active zone. Compare the trigger timing before and after the change. If the false trigger stops, the result may point to a setup cause.
- Reposition the sensor without changing other settings. Observe whether the trigger follows the physical location or remains unchanged. A location-dependent result may indicate an environmental or placement-related source.
- Use a reset or recalibration check only after room and setup causes have been tested. If the behaviour persists after recalibration, a sensor fault may remain possible, but further confirmation is still needed.
- Review the state log, where available, and compare repeated trigger timing with each controlled change. Consistent evidence across observations provides stronger support than a single event.
If the trigger source remains unclear after the isolation test, continue with the general troubleshooting guide for broader diagnostic checks.
This chart outlines a step-by-step isolation test to determine whether a false trigger is caused by the room environment, sensor setup, or a sensor fault.
When false occupancy needs reset, recalibration, or replacement
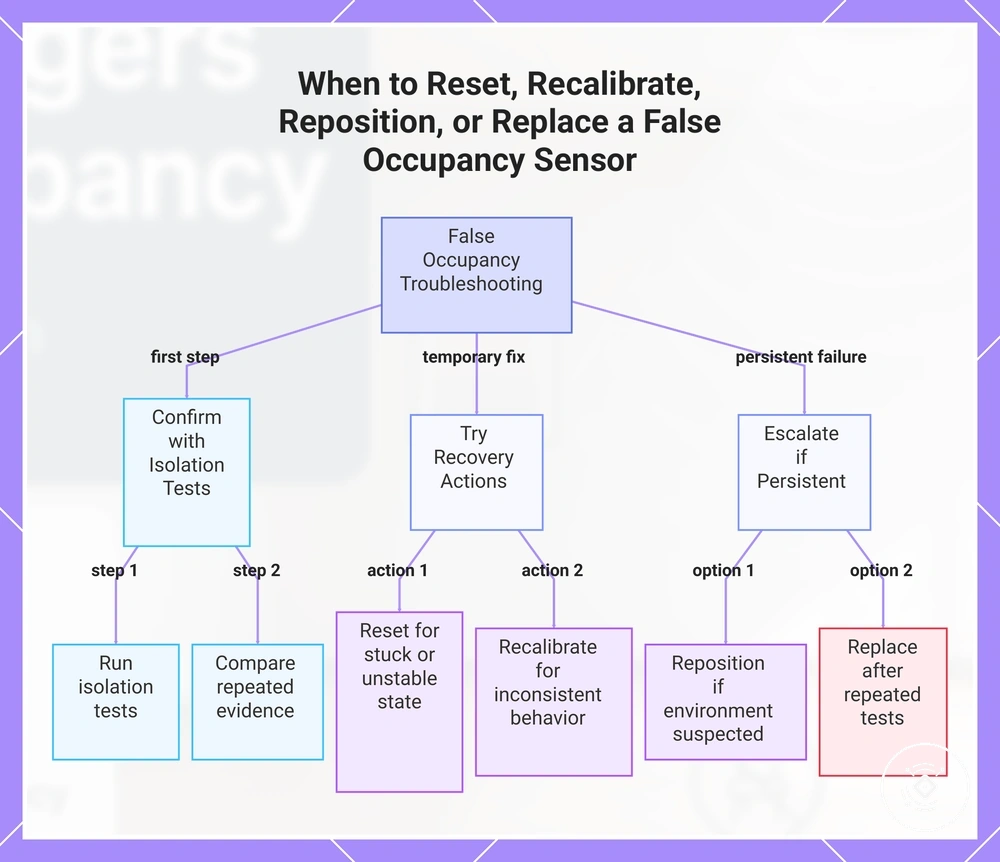
When false occupancy needs reset, recalibration, or replacement depends on whether repeated evidence shows that normal tuning is no longer enough. False occupancy should first be confirmed through isolation tests rather than a single unexpected trigger. This checklist separates persistent failure from ordinary setup sensitivity, and escalation should follow repeated evidence rather than an isolated event.
Reset, recalibration, repositioning, and replacement each address a different stage of troubleshooting. A reset may help recover from a temporary stuck state, while recalibration may be appropriate when sensor behaviour becomes inconsistent or calibration not saving continues after repeated attempts. Repositioning remains appropriate when the environment appears to influence detection, whereas replacement is better considered only after repeated testing continues to suggest a possible sensor fault in a simplified room setup.
- Repeated false occupancy after isolation tests: If the same trigger pattern continues after controlled testing, further escalation may be appropriate. Compare repeated evidence before considering more significant changes.
- Firmware instability or pairing instability: If behaviour changes unpredictably after normal checks, a reset and retest may help determine whether the condition is temporary or requires further investigation.
- Calibration not saving: If recalibration repeatedly fails to remain applied, the result may suggest a configuration or device issue. Repeat the recalibration process before moving to a higher recovery step.
- Detection remains in a stuck state after reset: If the false occupancy state persists after a reset and repeated testing, additional investigation may be justified because normal recovery has not occurred.
- Triggers continue in a simplified room setup: If false occupancy remains after environmental influences have been reduced, replacement may become a reasonable consideration when repeated evidence continues to support that conclusion.
Replacement should not be the first response to false occupancy. It is a qualified decision that should follow repeated evidence from testing rather than the first false trigger.
This chart shows the troubleshooting steps for false occupancy, from confirmation through isolation tests to escalation based on repeated evidence.