
mmWave Presence Sensor Calibration and Settings
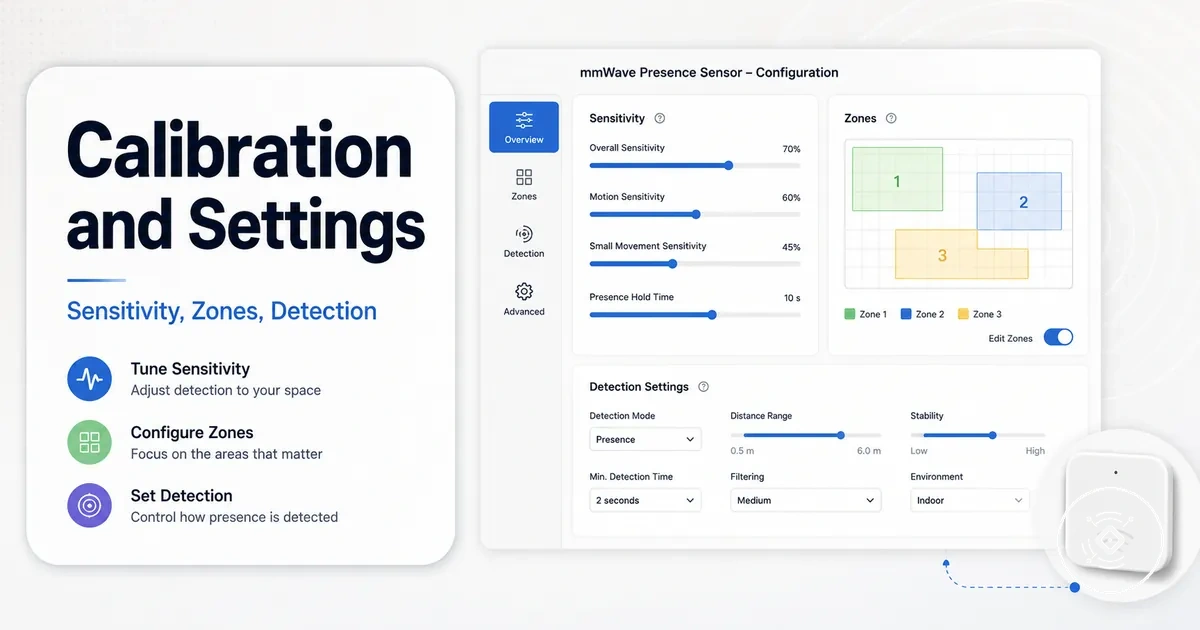
mmWave presence sensor calibration starts by adjusting the settings that adapt detection behavior to a specific room. Rather than changing the sensor's core capability, calibration aligns how the sensor responds to the space in which it operates. The exact configuration depends on model controls, room conditions, furniture, moving objects, mounting position, and integration behavior. The main configurable dimensions are sensitivity, zones, range, and occupancy timeout.
Calibration is the room-specific configuration of detection settings rather than a hardware modification. The mmWave presence sensor guide explains the underlying sensing concept, while calibration focuses on adjusting app control and available model controls to suit the environment. Supported settings and their effects can vary depending on the sensor model and the room in which it is used.
Poor calibration settings may contribute to missed presence or false occupancy when sensitivity, zones, range, or occupancy timeout do not match the actual detection area. Safe adjustment usually involves making gradual changes while observing how the sensor responds under normal room conditions. Calibration can improve how a mmWave presence sensor interprets room signals, but it cannot overcome unsuitable placement, unsupported controls, or physical detection limits. Before changing individual settings, confirm that the room setup and control access are ready for configuration.
Calibration prerequisites after placement and setup
Calibration should begin only after placement and setup are stable so that detection behavior reflects the room instead of changing setup conditions. Stable sensor power, a fixed mounting position, clear room boundaries, and consistent app access create a dependable starting point for calibration. These calibration prerequisites matter because changing the environment while adjusting settings makes it harder to judge the effect of each change.
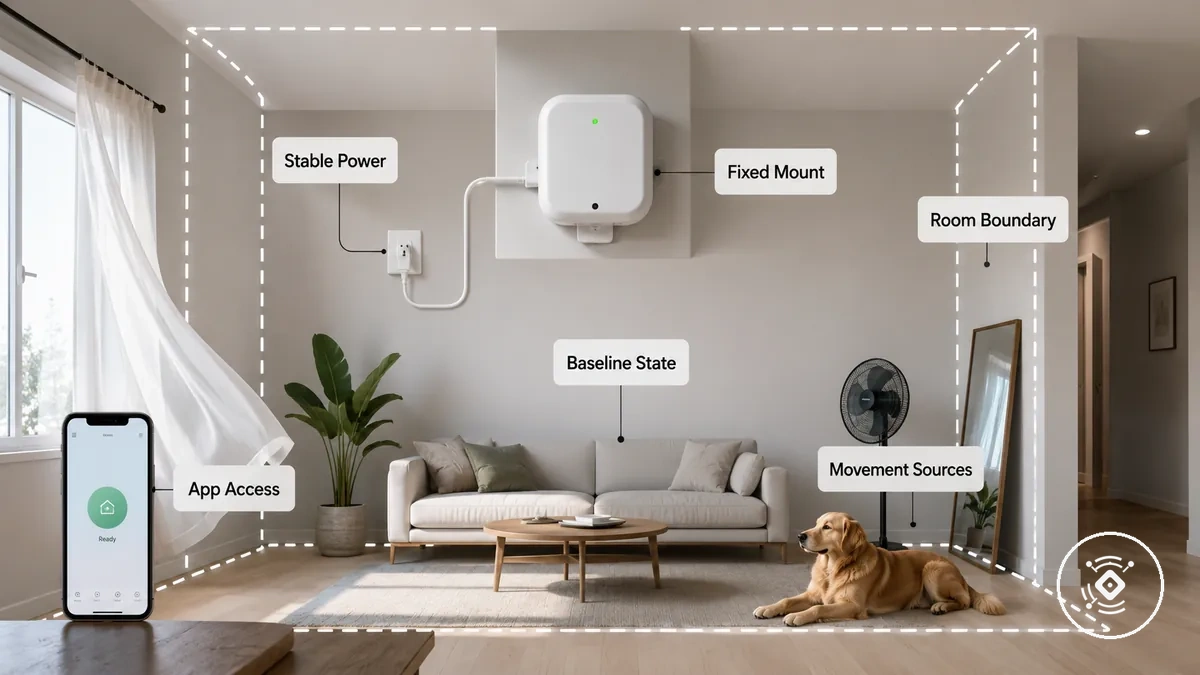
Calibration prerequisites are the baseline conditions that remain consistent before tuning begins. Sensor power should be stable, the mounting position should already match the intended detection area, and app access should provide visibility of available firmware or integration controls where supported. A clear baseline occupancy state, such as a known empty or occupied room, helps establish a consistent reference. These setup conditions should remain unchanged until calibration is complete, while sensitivity and similar settings can be adjusted during calibration.
Use the checklist below to verify room readiness before changing calibration values. If reflective surfaces, fans, curtains, pets, or a nearby hallway may influence detection behavior, note those conditions first rather than compensating for them immediately through configuration. Review sensor placement if the mounting position or room boundaries still require adjustment. The checklist may vary slightly depending on the room and the sensor model.
- Confirm that sensor power is stable.
- Verify that the mounting position is secure and unchanged.
- Check that room boundaries match the intended detection area.
- Confirm app or hub access and verify firmware visibility where available.
- Establish a consistent baseline occupancy state before changing settings.
- Identify movement sources such as reflective surfaces, fans, curtains, pets, or nearby hallways that may affect calibration.
These checks verify readiness for calibration but do not replace full installation and setup guidance if the initial setup still requires attention.
Room conditions before calibration
Room conditions should be stabilized before calibration because changes in the environment can alter mmWave detection behavior. A consistent room state helps separate the effect of calibration settings from changes in the surroundings. Room conditions before calibration matter because unstable conditions can influence sensor readings while values are being adjusted.
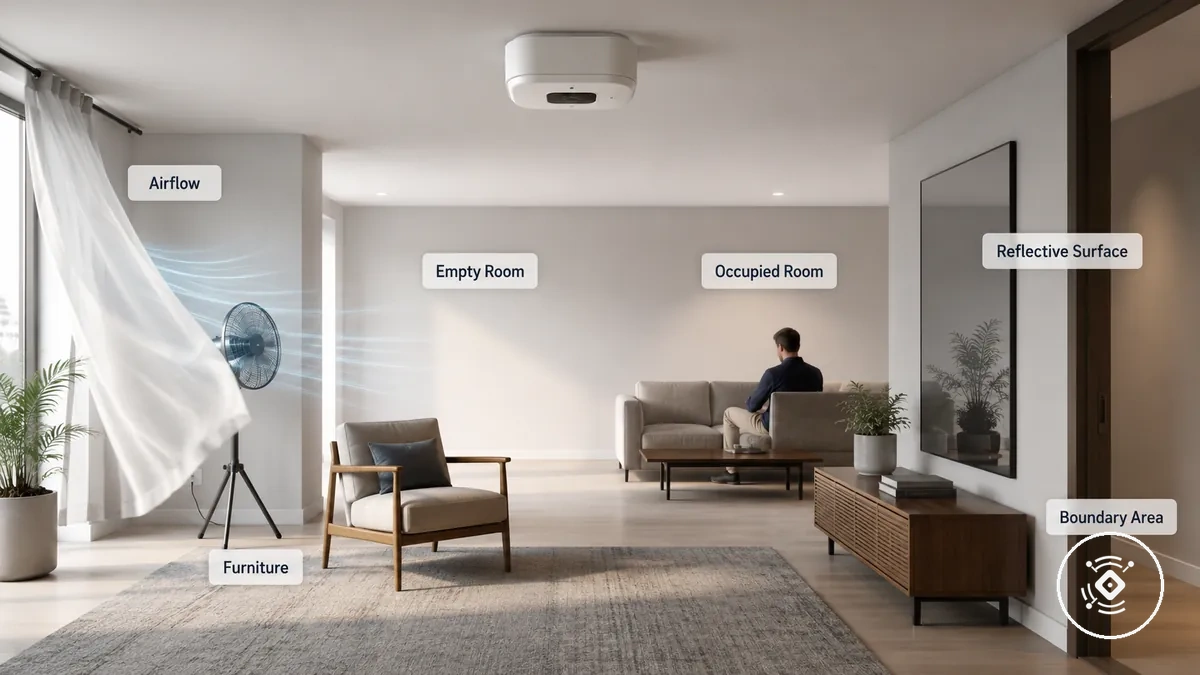
For example, a sensor calibrated in an empty room may respond differently after large furniture is moved or continuous movement from curtains or fans is introduced. These conditions should be noted before calibration, although they do not always need to be removed. The checks below distinguish conditions to stabilize from conditions that should simply be observed before changing sensor values.
- Empty room or occupied room: Use a known room state as the baseline and observe whether occupancy changes during calibration.
- Furniture position: Keep major furniture in its intended location because moving it may change the effective detection area, especially near boundary areas.
- Moving objects and airflow: Observe curtains, fans, or other airflow-driven movement that may influence detection behavior under certain conditions.
- Reflective surfaces: Note nearby reflective surfaces and observe whether changes in the environment appear to affect sensor responses.
- Boundary areas: Watch for movement near room edges or adjacent spaces that may enter the intended detection range and influence calibration observations.
App or integration controls for changing settings
App or integration controls for changing settings depend on the controls exposed by the sensor app, hub, or smart-home integration. Available app controls vary by model, firmware, and ecosystem, so the same calibration options may not be available on every device. The available control surface is therefore model dependent.
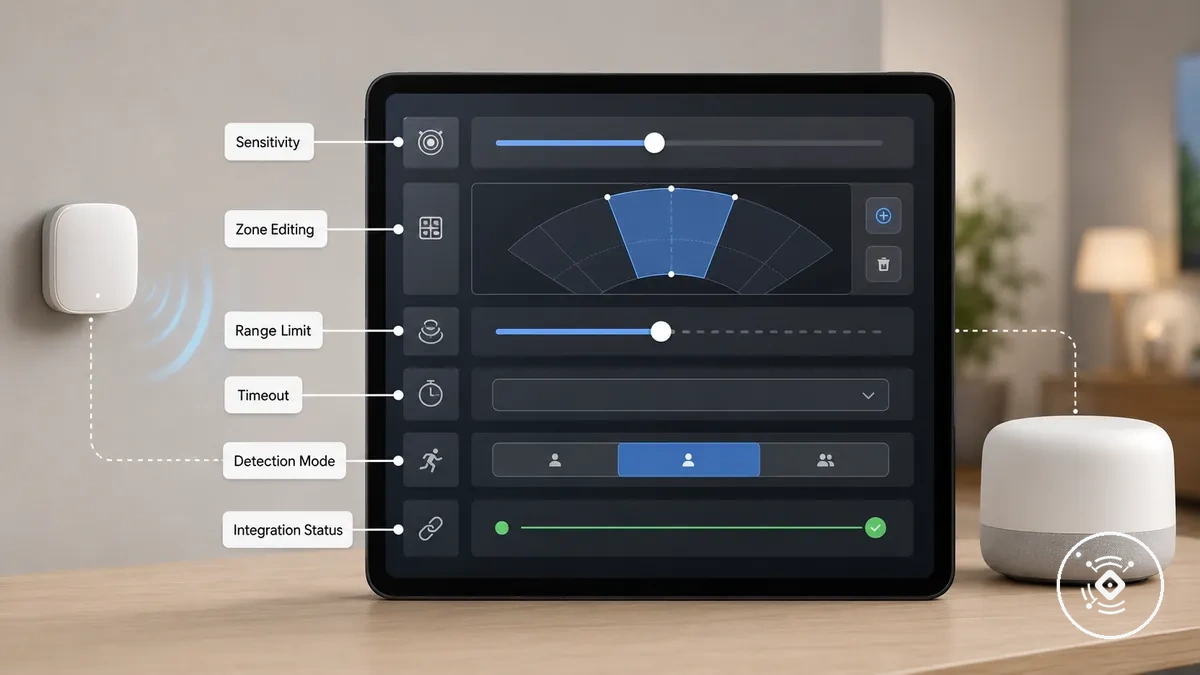
If a setting is unavailable, first review the app controls, integration controls, or hub configuration menu to identify which options are exposed. Depending on the device and firmware, available controls may include a sensitivity slider, distance limit, zone editing, timeout value, or detection mode. Missing controls may indicate a device or integration limitation rather than a calibration error. The comparison below distinguishes what the control surface exposes from what may remain unavailable.
| Control type | What it changes | If it is missing |
|---|---|---|
| Sensitivity slider | Adjusts detection responsiveness where the option is available. | Responsiveness may not be configurable through the exposed options. |
| Distance limit | Changes the intended detection range when supported. | Range adjustment may not be available through the current control source. |
| Zone editing | Defines monitored areas when the feature is exposed. | Calibration may be limited to room-level adjustments. |
| Timeout value | Changes how long occupancy is maintained after movement is no longer detected. | Occupancy timing may remain fixed by the available configuration. |
| Detection mode | Selects an available operating mode where supported. | The sensor may support additional functions internally, but the current app, hub, or integration does not expose that option. |
Detection settings that control calibration outcomes
Detection settings are the configurable controls that determine how a mmWave presence sensor interprets room occupancy during calibration. Calibration outcomes depend on sensitivity, range limit, zones, occupancy timeout, response delay, and related detection settings working together rather than on one value alone. These settings interact, so changing one configuration value can influence the effect of another.
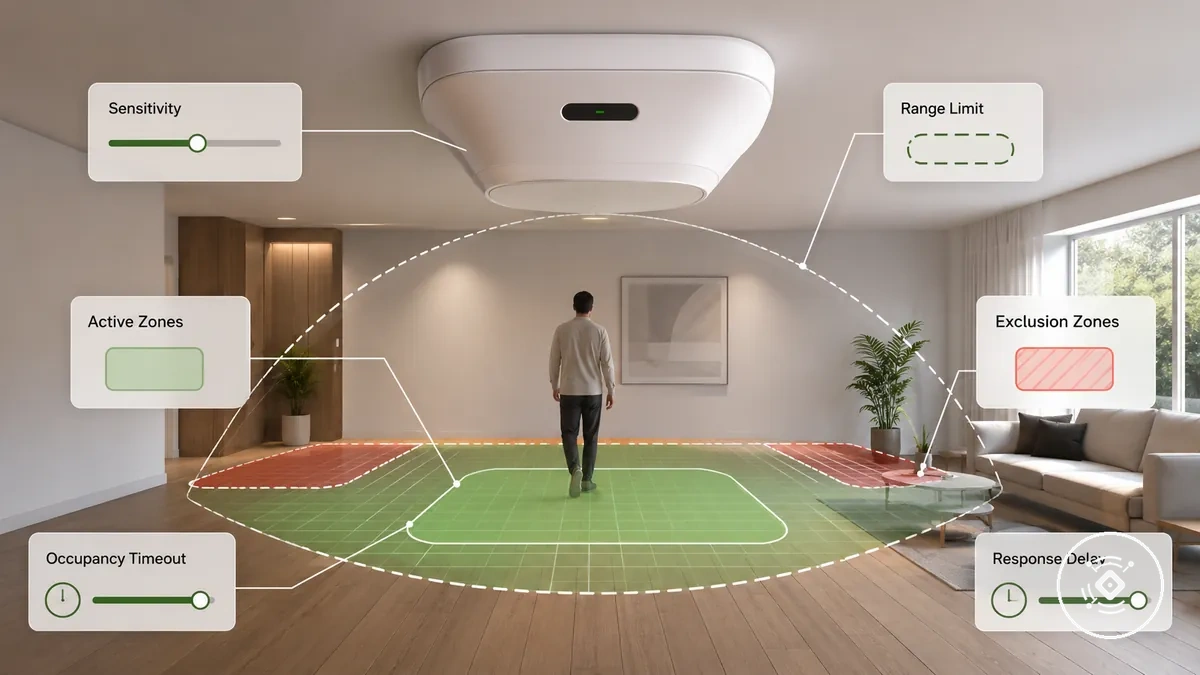
Detection settings that control calibration outcomes should be assessed as a combined configuration instead of adjusting a single value in isolation. When sensitivity, range limit, zones, or timing values are changed, the likelihood of false detection or missed presence may also change depending on the room and detection area. The table below organizes the main settings by adjustable value, likely effect, and the risk of values being set too high or too low.
| Setting | Adjustable value or condition | Likely effect | Risk if too high or too low |
|---|---|---|---|
| Sensitivity | Sensitivity or threshold | Changes how readily presence may be detected. | Higher sensitivity may increase false detection, while lower sensitivity may increase missed presence. |
| Range limit | Detection area or room boundary | Defines the intended detection area. | A larger range may include doorway exposure, while a smaller range may exclude intended occupancy. |
| Active zones | Included detection area | Focuses occupancy monitoring within selected areas. | Broad zones may include unnecessary activity, while smaller zones may miss expected occupancy. |
| Exclusion zones | Excluded detection area | Prevents selected areas from contributing to occupancy detection. | Too much exclusion may reduce intended coverage, while too little may allow unwanted detection. |
| Occupancy timeout | Vacancy delay | Controls how long occupancy remains active after movement is no longer detected. | A longer timeout may delay vacancy, while a shorter timeout may clear occupancy too quickly. |
| Response delay | Delay before reporting occupancy | Influences when occupancy changes are reported. | A longer delay may slow automation responses, while a shorter delay may react to brief movement. |
For additional context on how detection distance and responsiveness relate to these settings, see range and sensitivity basics before making detailed calibration adjustments.
Sensitivity and threshold level
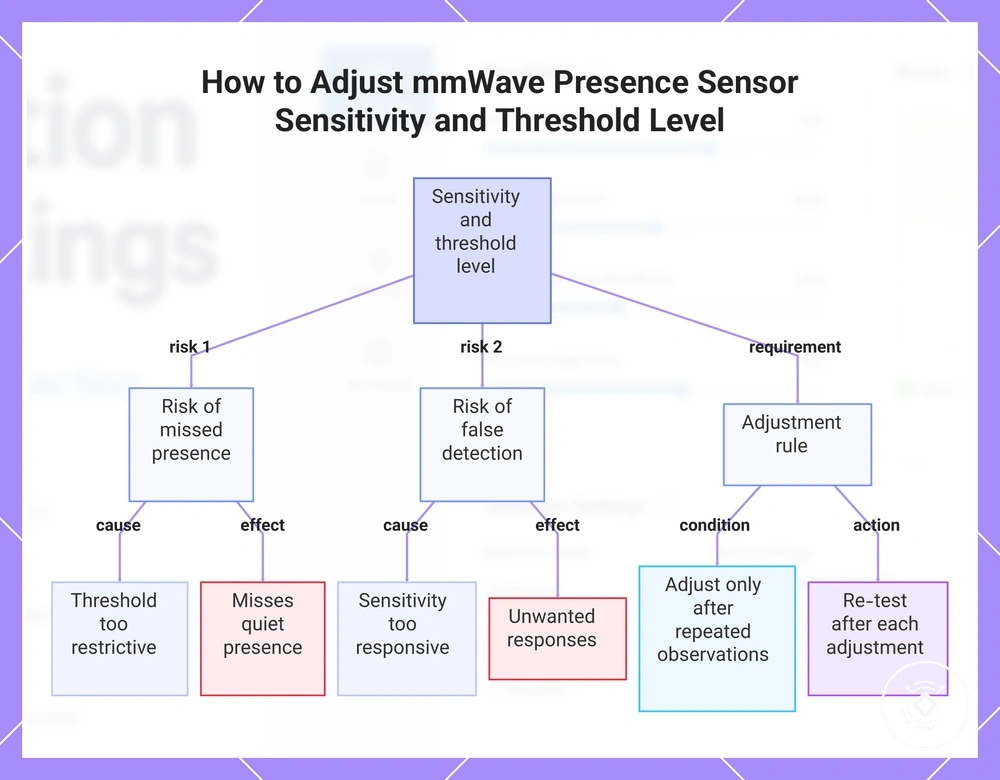
Sensitivity and threshold level determine how readily a mmWave presence sensor responds to small movement and still presence. A lower threshold may allow the sensor to detect more subtle activity, while a higher threshold may require more noticeable movement before occupancy is detected. The main trade-off is balancing the risk of missed presence against false detection.
If missed presence occurs, the sensitivity or threshold level may be too restrictive because the response threshold is not detecting the expected level of movement. If false detection becomes more frequent, the sensitivity may be too responsive for the room conditions. For example, increasing sensitivity may improve detection of a person sitting quietly, but it can also increase unwanted responses, so any adjustment should be followed by re-testing under normal room conditions.
- A lower threshold may improve detection of small movement and still presence but can increase the likelihood of false detection.
- A higher threshold may reduce unwanted responses but can increase the risk of missed presence in a quiet room.
- Adjust the sensitivity level only when repeated observations indicate missed presence or false detection.
- Re-test after each adjustment because the effect depends on the room, mounting position, and surrounding conditions.
This chart shows the trade-offs between missed presence and false detection, and explains the correct adjustment and re-testing procedure.
Detection distance and range limit
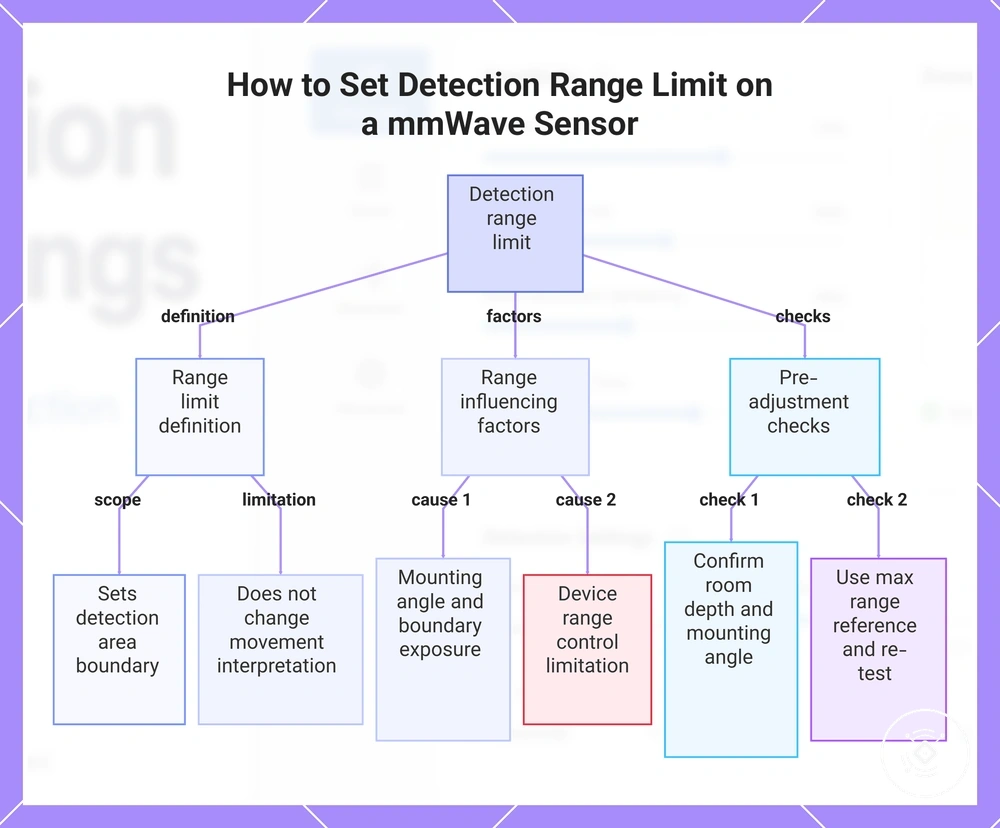
Detection distance and range limit define the physical area that a mmWave presence sensor evaluates for occupancy. The range limit sets the detection area boundary rather than changing how movement is interpreted, and the usable range may vary with room depth and the device's available range control. Room size should therefore guide how the detection distance is assessed.
If doorway exposure or far-zone detection includes movement beyond the intended area, reducing the range limit may help narrow the sensor's evaluation. Range control can improve boundary control, but it cannot fully compensate for poor placement because mounting angle and boundary exposure still affect what the sensor evaluates. Before adjusting the range setting, verify the following conditions:
- Confirm that the room depth matches the intended detection area.
- Check whether the mounting angle directs detection toward room boundaries or a doorway.
- Observe whether near-field detection and far-zone detection match the intended coverage.
- Review whether boundary exposure may include movement from adjacent areas.
- Treat the device-reported maximum range as a reference when available, then re-test after any range adjustment.
This chart explains the detection range limit, its function, the factors that affect usable range, and the key checks to perform before adjusting the range setting.
Occupancy timeout and response delay
Occupancy timeout and response delay determine when a mmWave presence sensor changes its occupancy state after detection changes. The occupancy timeout controls how long occupancy is retained before a vacancy state is reported, while the response delay influences when occupancy changes trigger automation. The timing trade-off is balancing responsiveness with stable occupancy behaviour.
For example, a quicker response may reduce automation lag, while a longer occupancy timeout may improve still-occupancy retention and reduce false vacancy in a quiet room. The most suitable timing depends on room type, activity pattern, and automation goals. Occupancy timeout and response delay should therefore be considered together because changing one timing setting may affect the overall balance shown below.
| Timing choice | Likely effect |
|---|---|
| Short occupancy timeout | May reduce vacancy delay and shorten light-off delay, but can increase the likelihood of false vacancy when occupants remain still. |
| Longer occupancy timeout | May improve still-occupancy retention but can increase vacancy delay and automation lag after the room becomes unoccupied. |
| Fast response delay | May reduce automation lag by reporting occupancy changes sooner, although brief movement may trigger more frequent automation changes. |
| Delayed response | May provide smoother response timing but can increase the delay before occupancy state changes are reported. |
| Still-use retention | May help maintain occupancy state during quiet activity, depending on the room and timing configuration. |
Calibrating detection zones for the room
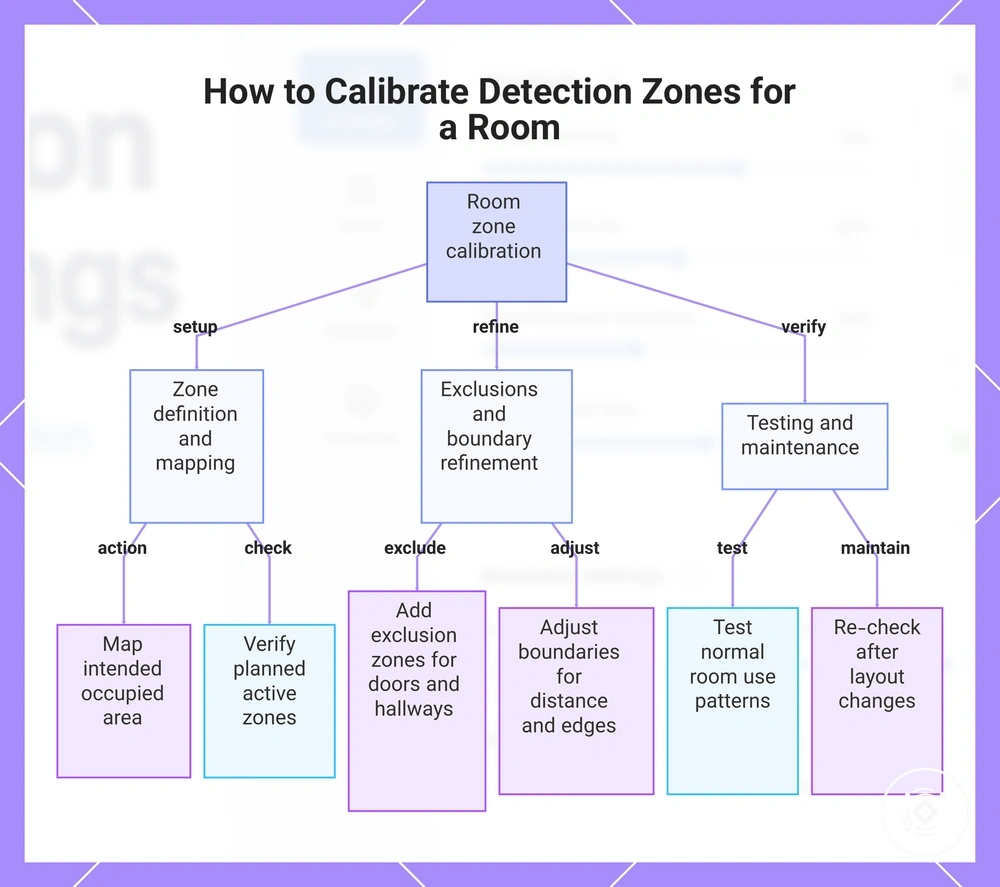
Calibrating detection zones for the room maps the sensor's detection areas to the room layout. Active zones define where presence should be recognised, while exclusion zones reduce attention to areas that should not contribute to occupancy. Clear boundaries help separate intended seating positions and walking paths from room edges, doors, and other sources of unwanted detection.
In an open-plan room, a desk or bed may need to remain inside an active zone while a nearby hallway or doorway is excluded. Multi-zone sensors may also allow distance bands to separate near and far areas, depending on how zone editing is exposed. Use the following steps to turn the room layout into practical detection boundaries.
- Map the intended occupied area: Identify seating positions, beds, desks, and normal walking paths that should count as presence. Verify that these locations fall within the planned detection zones.
- Define active zones: Mark the areas where occupancy should be recognised. Check each active zone by using the room normally and confirming that expected presence is reported.
- Add exclusion zones: Exclude doors, hallways, moving objects, or adjacent spaces that may contribute to unwanted detection. Verify that activity in those excluded areas does not consistently affect the intended room state.
- Adjust distance bands: Where supported, separate near and far detection areas to match room depth and important seating positions. Confirm that far-zone detection does not extend beyond the useful room boundary.
- Refine room edges: Review room edges, doors, and open-plan boundaries where adjacent movement may enter the detection area. Narrow or reshape the relevant zone if boundary exposure remains too broad.
- Test normal room use: Move between the main seating positions, walking paths, and quiet-use areas. Confirm that active zones retain intended occupancy while exclusion zones reduce unwanted detection.
- Re-check after layout changes: If furniture, doors, desks, beds, or room use changes, repeat the zone verification because the effective boundaries may need adjustment.
This chart shows the main steps to map, define, exclude, and test detection zones for accurate room occupancy sensing.
Active detection zones
Active detection zones are the intended detection areas where occupancy should be recognised within the room layout. These active detection zones define which seating areas, walking paths, beds, desks, and other room-use areas contribute to occupancy while maintaining zone focus through appropriate distance bands. Their purpose is to align detection with the areas where occupancy is expected.
For example, a home office may keep the desk and nearby seating area inside an active detection zone while leaving a doorway outside that zone when it is not intended to contribute to occupancy. After defining the active detection zones, verify that normal movement and still presence are recognised where expected.
- Seating areas: Include chairs or sofas where occupants may remain still so the detection area can continue to recognise occupancy.
- Walking paths and doorways: Include entry paths only when they are intended to contribute to occupancy rather than brief pass-through movement.
- Beds and desks: Position these room-use areas within active detection zones when they represent the primary locations for expected occupancy.
- Distance bands: Where supported, use distance bands to help keep the detection area focused on intended occupancy and verify that room edges do not extend beyond the desired coverage.
Exclusion zones for unwanted detection areas
Exclusion zones tell the sensor which areas should not count toward room occupancy. They can reduce unwanted detection from ignored areas such as hallways, adjacent rooms, doorway spillover, or other locations outside the intended detection area. Their purpose is to separate valid occupancy from activity that should not influence the room state.
Use exclusion zones when repeated activity outside the intended room area appears to affect occupancy detection. Excluding selected areas may reduce unwanted detection from moving objects or boundary activity, but it may not resolve poor placement or through-wall issues. Exclusion zones for unwanted detection areas can be used to filter out:
- Hallway and doorway spillover: Ignore movement passing doors or nearby hallways that should not count as room occupancy.
- Moving objects: Exclude areas where fans or curtains may create repeated movement unrelated to occupancy.
- Reflective surfaces: Consider excluding areas near reflective surfaces when they appear to contribute to unwanted detection.
- Pets: Exclude areas frequently used by pets when their movement should not contribute to occupancy.
- Adjacent rooms: Exclude neighbouring spaces when movement outside the intended room may influence occupancy detection.
- Window exposure: Review windows and nearby movement when activity beyond the room boundary may affect detection.
Tuning sensitivity for reliable presence detection
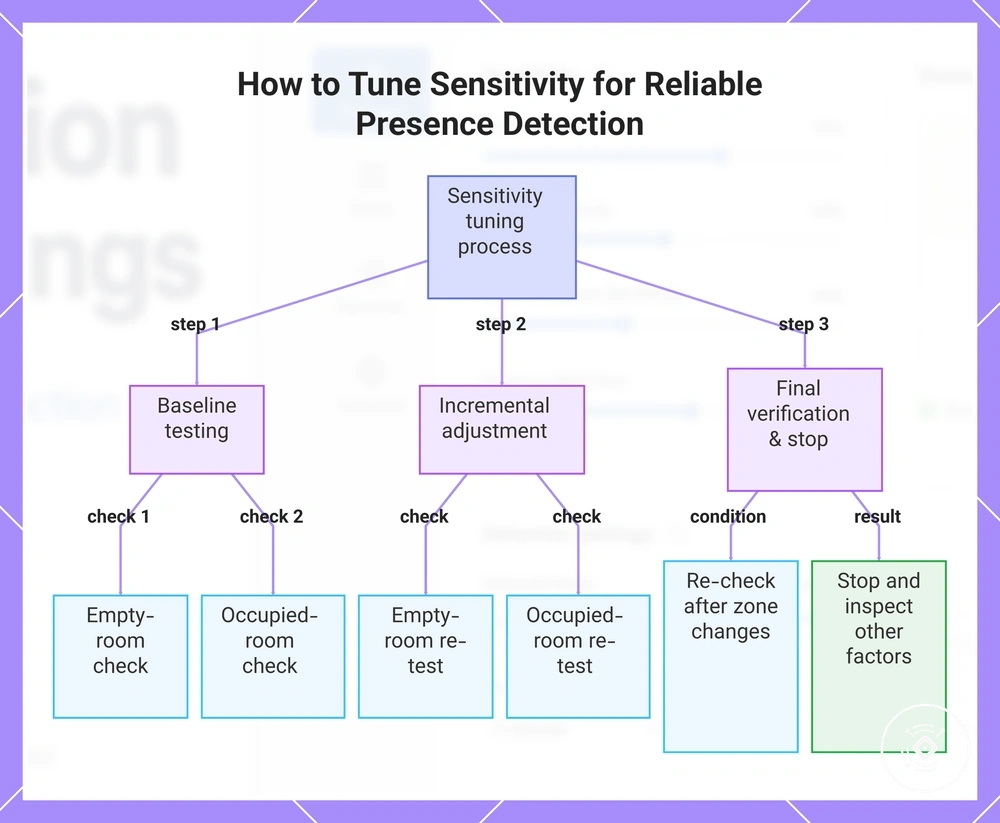
Tuning sensitivity for reliable presence detection should be done gradually rather than through large adjustments. Sensitivity tuning balances still-presence capture against unwanted triggers, and reliable results depend on controlled testing rather than a single setting.
Baseline testing should come before any adjustment so each change can be compared with a known starting point. Test both empty-room and occupied-room conditions, then make incremental changes and re-test to avoid unstable tuning. Use the following sequence to guide the adjustment.
- Establish baseline testing: Observe the current behaviour without changing sensitivity. Perform an empty-room check and an occupied-room check to identify whether missed presence or unwanted triggers occur.
- Make incremental changes: Adjust sensitivity in small steps and repeat both test states. Continue only when presence reliability improves without increasing unwanted triggers.
- Repeat the empty-room check: Leave the room unoccupied and observe whether false detection appears. If unwanted triggers increase, reduce sensitivity or return to the previous setting.
- Repeat the occupied-room check: Test normal movement and still presence. If missed presence remains, make another small adjustment only when the empty-room result remains stable.
- Re-check after zone changes: Repeat baseline testing whenever active or exclusion zones change. If detection behaviour shifts, reassess sensitivity against the updated zone layout.
- Use a stop signal: Stop tuning when further changes no longer improve both test states. Inspect placement, range, zones, or occupancy timeout when the remaining issue appears unrelated to sensitivity.
This chart shows the step-by-step process for adjusting sensitivity to balance detection reliability and avoid unwanted triggers, including baseline testing, incremental changes, and final verification.
Lowering sensitivity to reduce false triggers
When false triggers occur repeatedly, lowering sensitivity can be an appropriate local adjustment. It may reduce unwanted detections caused by over-wide sensitivity, but excessive reduction can increase missed presence.
After lowering sensitivity, repeat the same empty-room and occupied-room tests to confirm that false triggers decrease without weakening intended detection. Persistent false occupancy after reasonable changes may require broader diagnosis of placement, range, zones, or other calibration limits.
- Empty-room detections: Check for over-wide sensitivity, reduce sensitivity slightly, then repeat the empty-room test.
- Moving objects: If fans or curtains coincide with unwanted detections, lower sensitivity cautiously and re-test under the same conditions.
- Adjacent movement: If movement outside the intended area affects occupancy, review the sensitivity response and repeat the boundary test after adjustment.
- Reflective surfaces: If reflective surfaces appear to coincide with false triggers, reduce sensitivity carefully and observe whether the behaviour changes.
- Over-wide sensitivity: If detection extends beyond the intended area, lower sensitivity and confirm during an occupied-room check that intended presence is still recognised.
Raising sensitivity for subtle still-presence detection
Raising sensitivity may help when quiet occupants are missed during still-presence detection. It can improve response to subtle presence during desk work, reading, sleeping, or low-motion seating, but higher sensitivity may also widen detection and increase false-trigger risk.
For example, a person reading at a desk may produce less movement than someone walking through the room, especially at a greater range distance. Increase sensitivity only in small steps, then re-test the low-motion activity and confirm that nearby movement does not create unwanted detection.
- Desk work: Raise sensitivity when still presence is missed at the desk, then verify that the adjustment does not extend detection beyond the intended area.
- Reading or low-motion seating: Increase sensitivity cautiously when quiet occupants are not retained, then re-test both the seating area and adjacent space.
- Sleeping: A higher setting may support low-motion detection around a bed, but the false-trigger risk should be checked under normal room conditions.
- Range distance: If missed presence occurs mainly farther from the sensor, raise sensitivity gradually and confirm that wider detection does not include unwanted movement.
Setting occupancy timeout before automation rules
Setting occupancy timeout before automation rules should match the room type, activity pattern, and downstream action that follows detected absence. The occupancy timeout controls the gap before a light-off delay, HVAC delay, or other automated response begins. The decision is a trade-off between comfort and responsiveness.
A hallway may suit a shorter timeout tendency because use is often brief, while an office or bedroom may need a longer tendency when quiet activity increases false vacancy risk. HVAC-related automation may also justify slower response timing when temporary absence should not trigger an immediate change. The table below compares these timing trade-offs without prescribing universal values.
| Room or use case | Timeout tendency | Reason | Risk to watch |
|---|---|---|---|
| Hallway | Shorter | Brief movement may support a quicker downstream action after detected absence. | An overly short timeout may react before movement has fully ended. |
| Bathroom | Moderate to longer | Low-motion activity may require more vacancy timing before a light-off delay begins. | A shorter setting may increase false vacancy risk. |
| Office | Longer | Desk work and quiet activity may need more time before automation rules treat the room as vacant. | A longer timeout may reduce responsiveness after the room is empty. |
| Bedroom | Longer | Resting or sleeping may involve limited movement while occupancy should still be retained. | An extended delay may postpone downstream action after actual vacancy. |
| HVAC-related automation | Conditional or slower | A longer HVAC delay may reduce abrupt changes when detected absence is temporary. | Too much delay may reduce responsiveness and extend unnecessary operation. |
Validating calibration in real room use
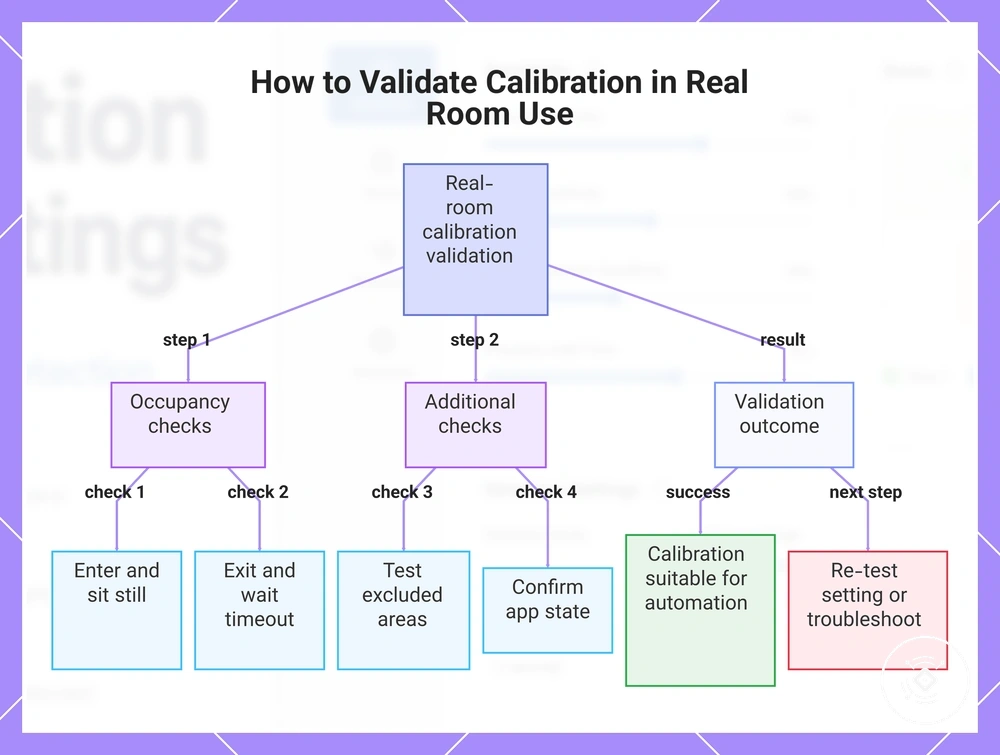
Validating calibration in real room use should happen before relying on the sensor for automation. The validation test should confirm the occupied state, empty state, entry, exit, still-use state, timeout behaviour, and app state across realistic room conditions. A reliable result depends on checking multiple states rather than one successful detection.
Walk into the room and confirm that entry changes the sensor to an occupied state, then sit still to check whether the still-use state remains active. Leave the room, wait through the configured timeout, and confirm that the sensor changes to the empty state after exit. Repeat the same checks while observing excluded areas and the app or hub state. Use the checklist below to verify each room state consistently.
- Entry check: Walk into the room and confirm that the occupied state appears in the app or hub.
- Still-use check: Sit quietly in a normal use position and confirm that occupancy remains active without repeated movement.
- Exit check: Leave the room and confirm that the sensor continues to show occupancy only for the intended timeout period.
- Timeout check: Wait through the full timeout and confirm that the app state changes from occupied to empty.
- Excluded-area check: Create movement in excluded areas and confirm that it does not consistently change the room state.
- State confirmation: Compare the physical room condition with the sensor, app, or hub state during each test.
- Repeat after changes: Run the validation test again after adjusting sensitivity, range, zones, or timeout.
Calibration may be suitable for real room use when entry, still occupancy, exit, timeout, excluded areas, and app state remain consistent across repeated checks. If one state fails, re-test the setting most closely connected to that result, such as sensitivity for missed still presence, zones for excluded-area activity, or timeout for delayed vacancy.
If inconsistent results continue after controlled re-testing, avoid relying on automation until the cause is clearer. Move to troubleshooting after calibration when occupied and empty states, boundary behaviour, or app state changes remain unresolved.
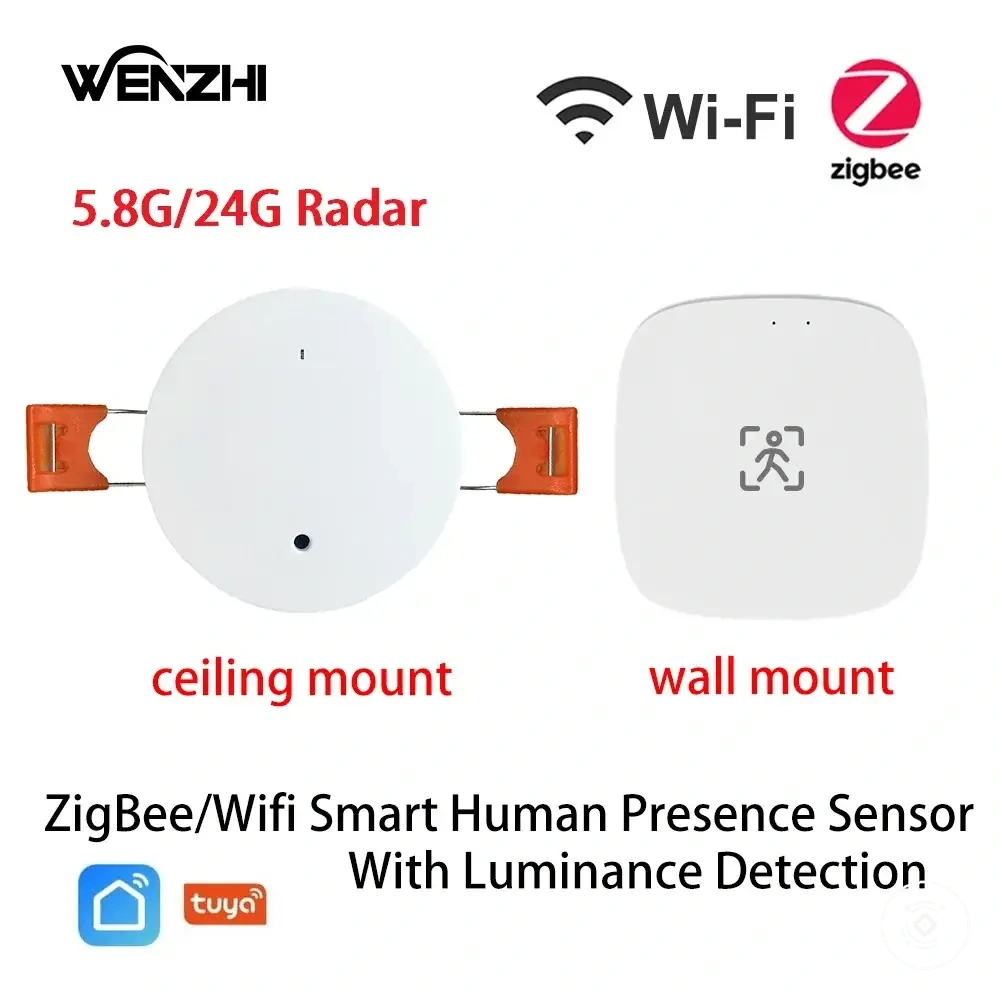
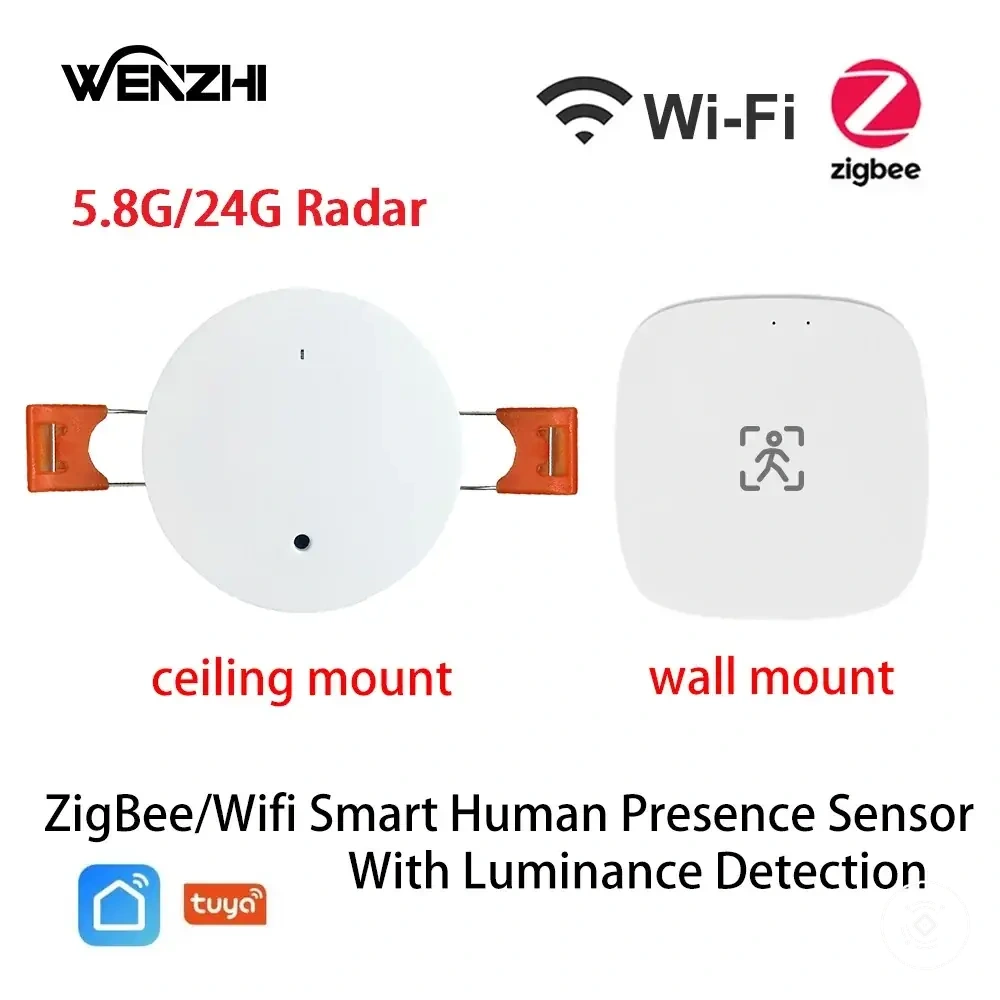
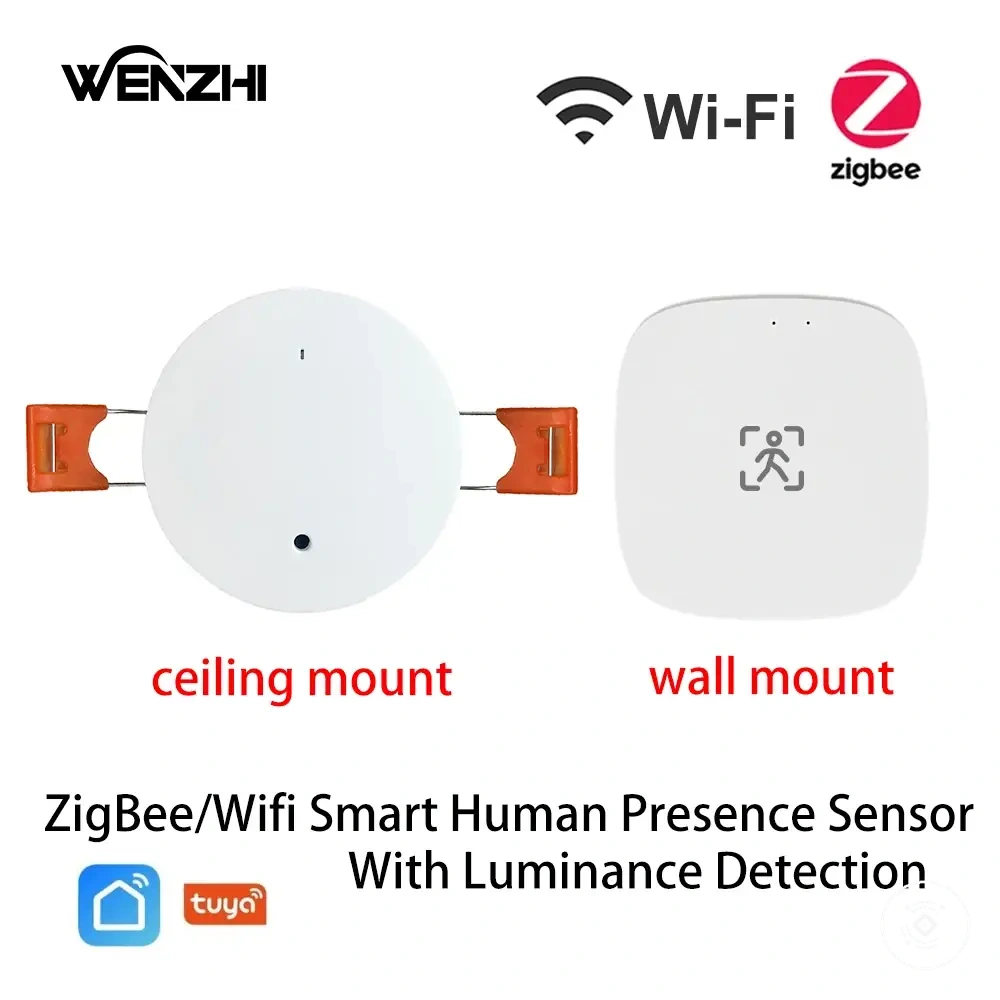
The products below are useful examples for comparing available options. Before buying, check that the compatibility criteria, key features, and product details match your needs.

This chart shows the main checks and outcome evaluation for validating sensor calibration in a real room before relying on automation.
Settings that reduce false detection before troubleshooting
False detection should be checked through configuration settings before broader troubleshooting begins. Settings such as sensitivity, range limit, exclusion zones, timeout, detection mode, and app state confirmation can reduce some unwanted detection when they match the room conditions. These checks are the first layer of diagnosis, but they may not resolve every cause of false occupancy.
Match each symptom to the setting most likely to influence it, then follow the corresponding adjustment path instead of changing multiple settings at once. Confirm each change with a diagnostic check and compare the app state with the actual room condition before making another adjustment. If local configuration checks do not improve the result, continue with false occupancy fixes for broader diagnosis.
| Setting | Risky value or condition | Symptom | Adjustment path |
|---|---|---|---|
| Sensitivity | Over-wide response | False detection in an empty room | Reduce sensitivity slightly, then repeat the same room test. |
| Range limit | Detection extends beyond the intended area | Adjacent movement affects occupancy | Reduce the range limit and confirm the updated coverage. |
| Exclusion zones | Important boundary areas are not excluded | Repeated unwanted detection near doors or neighbouring spaces | Review exclusion zones and re-test the affected area. |
| Timeout | Vacancy timing is longer than intended | Delayed vacancy after the room is empty | Review the timeout setting and verify app state confirmation after the adjustment. |
| Detection mode | Mode does not match the room conditions | Unexpected occupancy behaviour | Select a more suitable detection mode, then repeat the diagnostic check. |
| Nearby moving objects | Fans, curtains, or similar movement near the detection area | Intermittent unwanted detection | Reduce the influence of nearby moving objects or adjust local settings before re-testing. |
| App state confirmation | Displayed state does not match room conditions | Unclear diagnosis after configuration changes | Confirm the app state after each adjustment before making additional changes. |